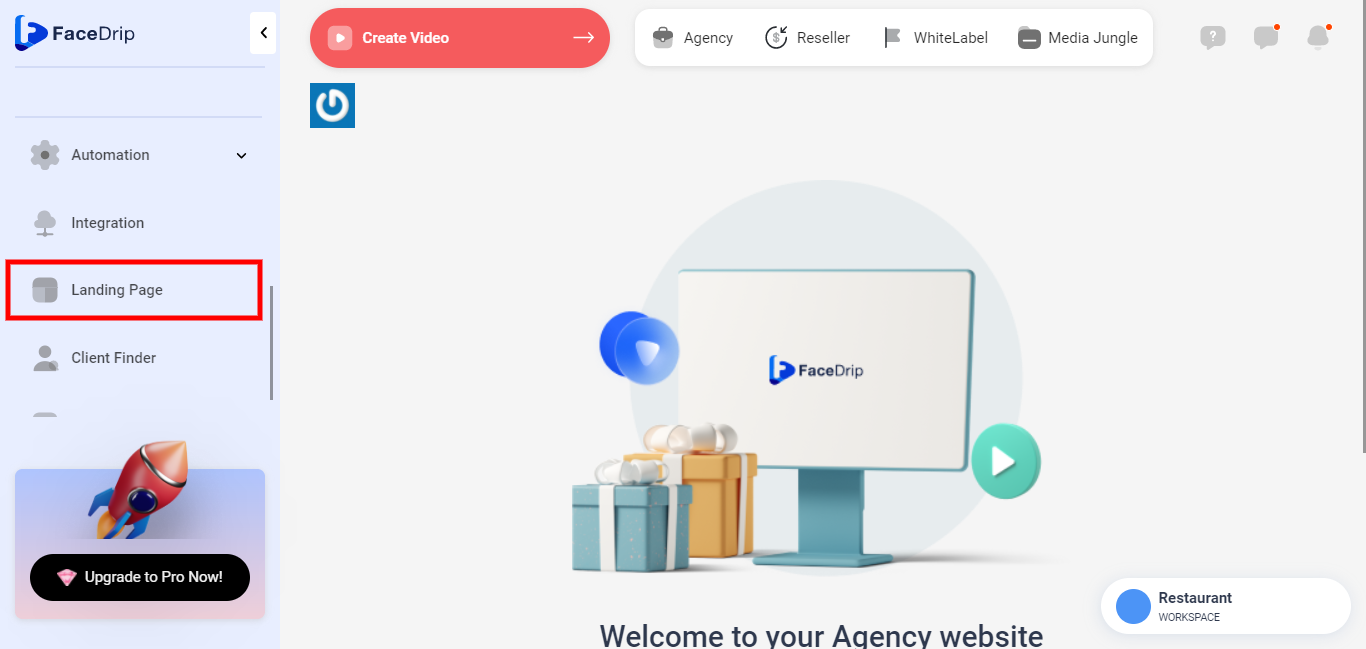
Step 1: On your dashboard, click on the landing page menu. You will be redirected to the landing page template dashboard.
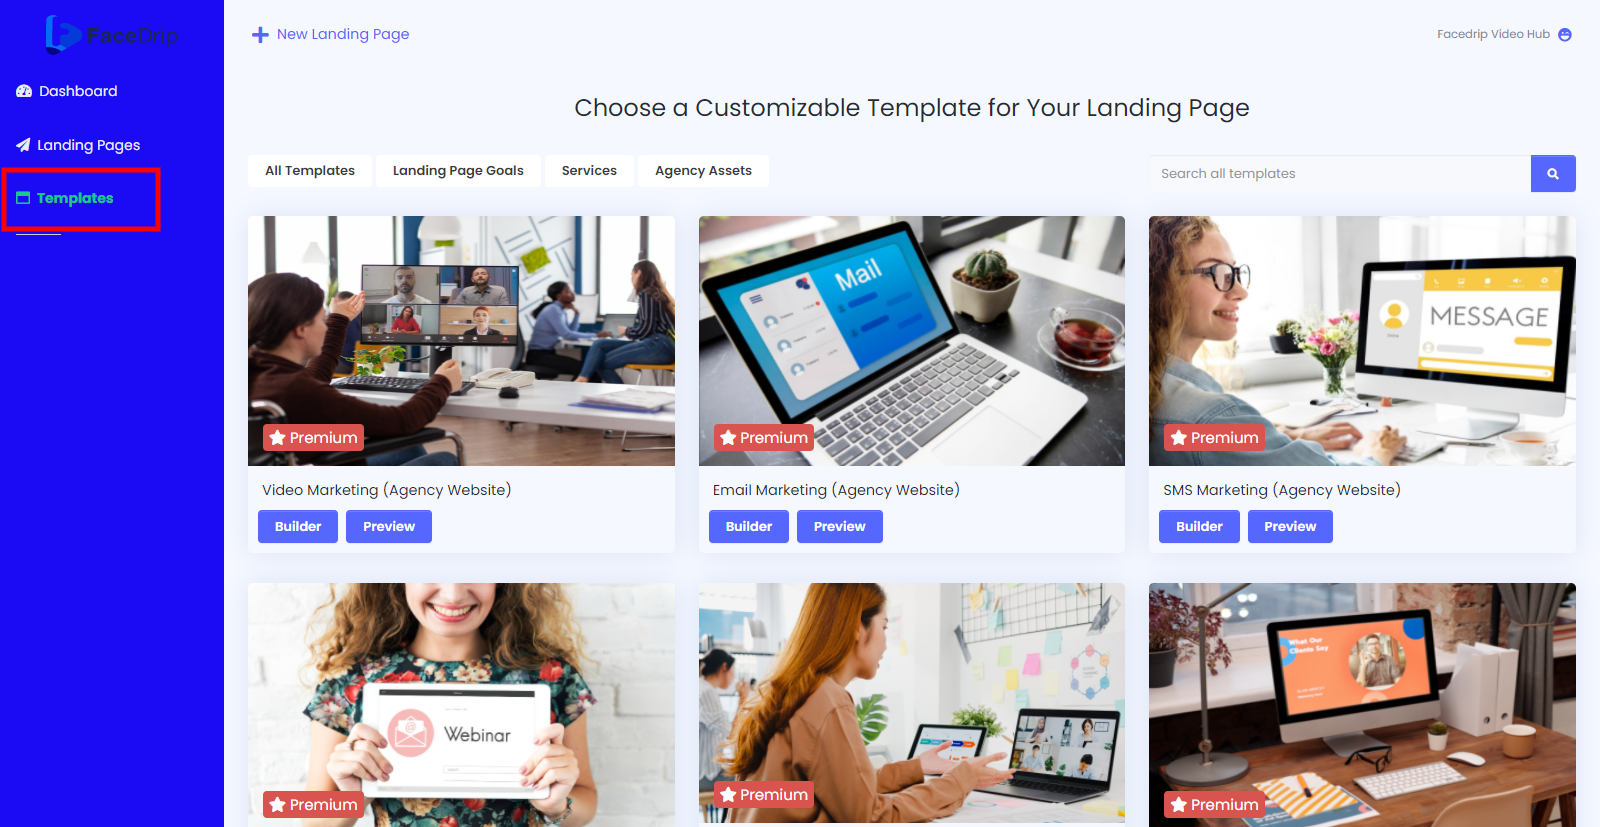
Step 2: Click the template in the left menu bar.
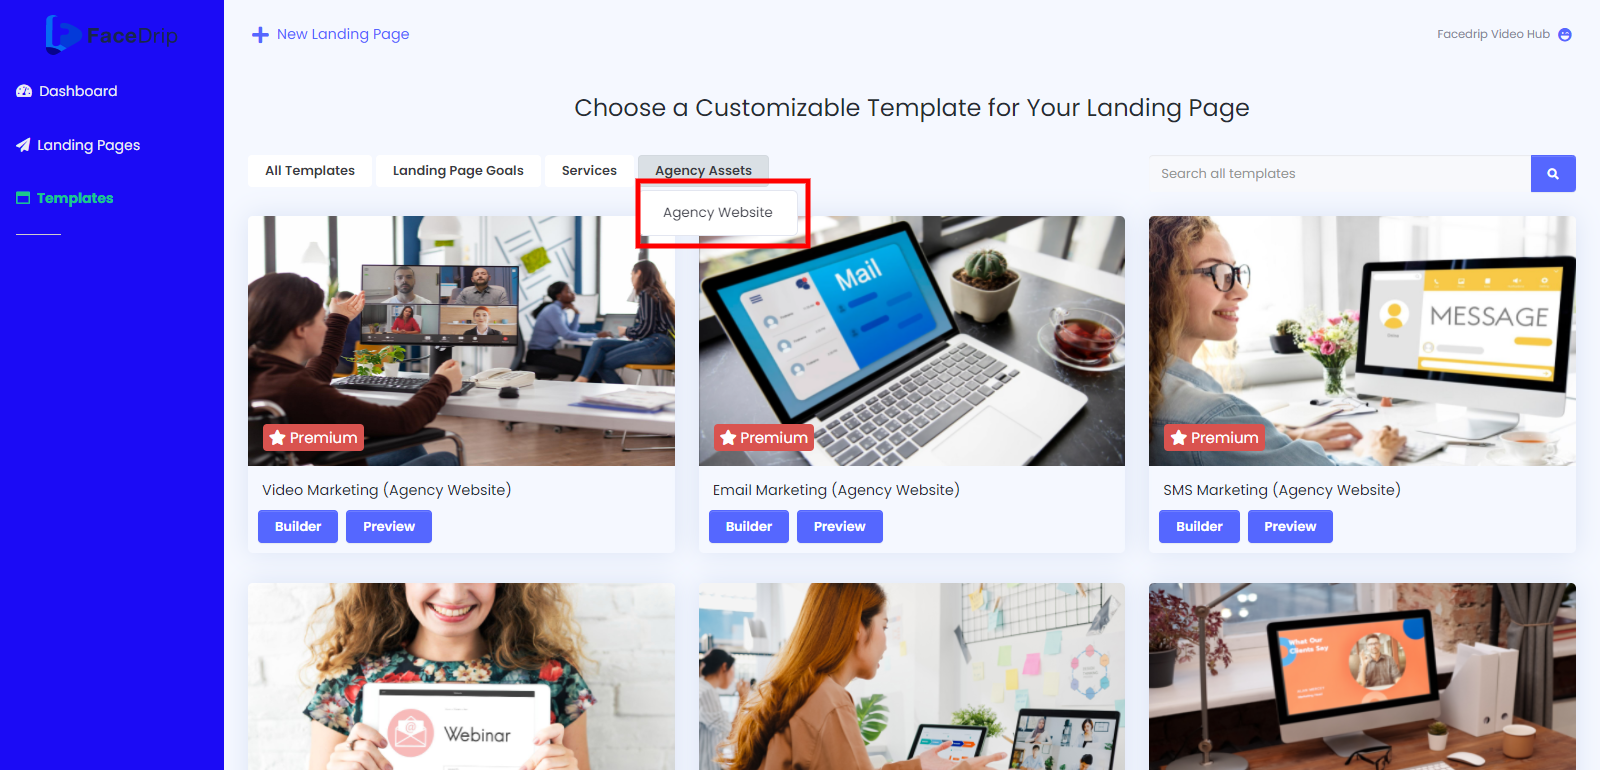
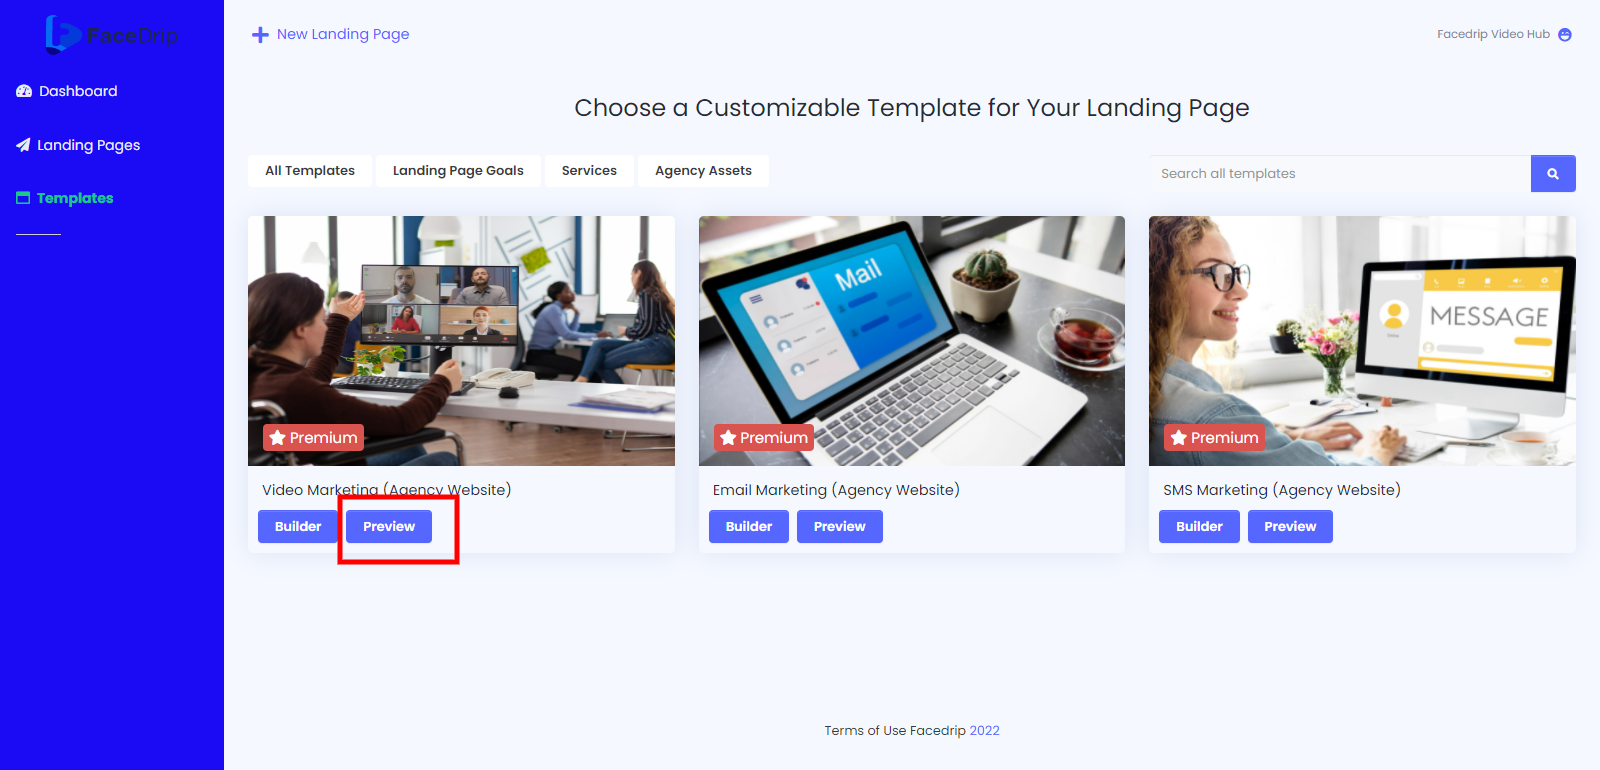
Step 3: Click on the Agency Assets tab and then click the Agency Website.
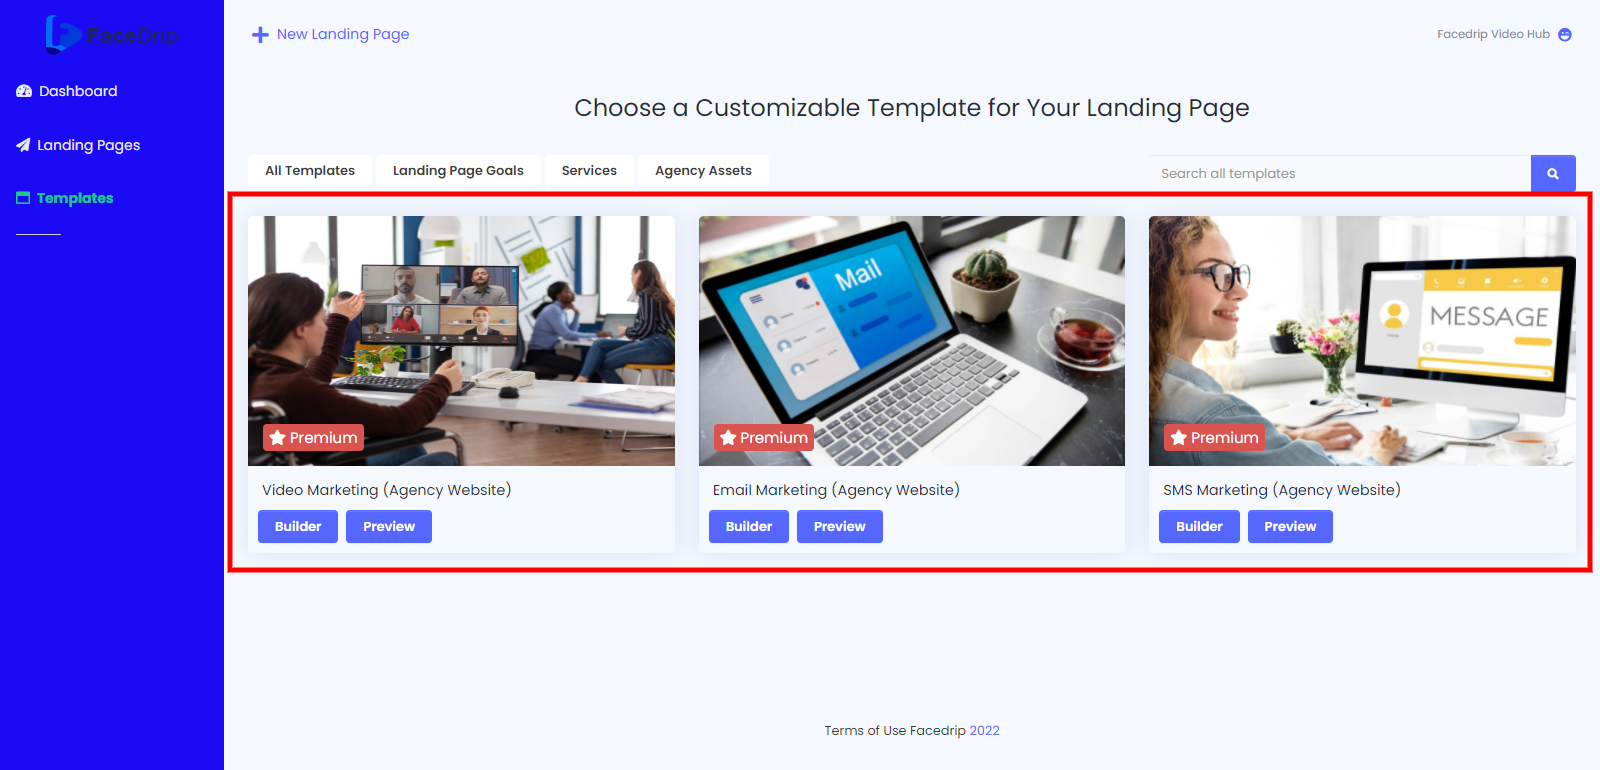
Here you will find all the agency websites
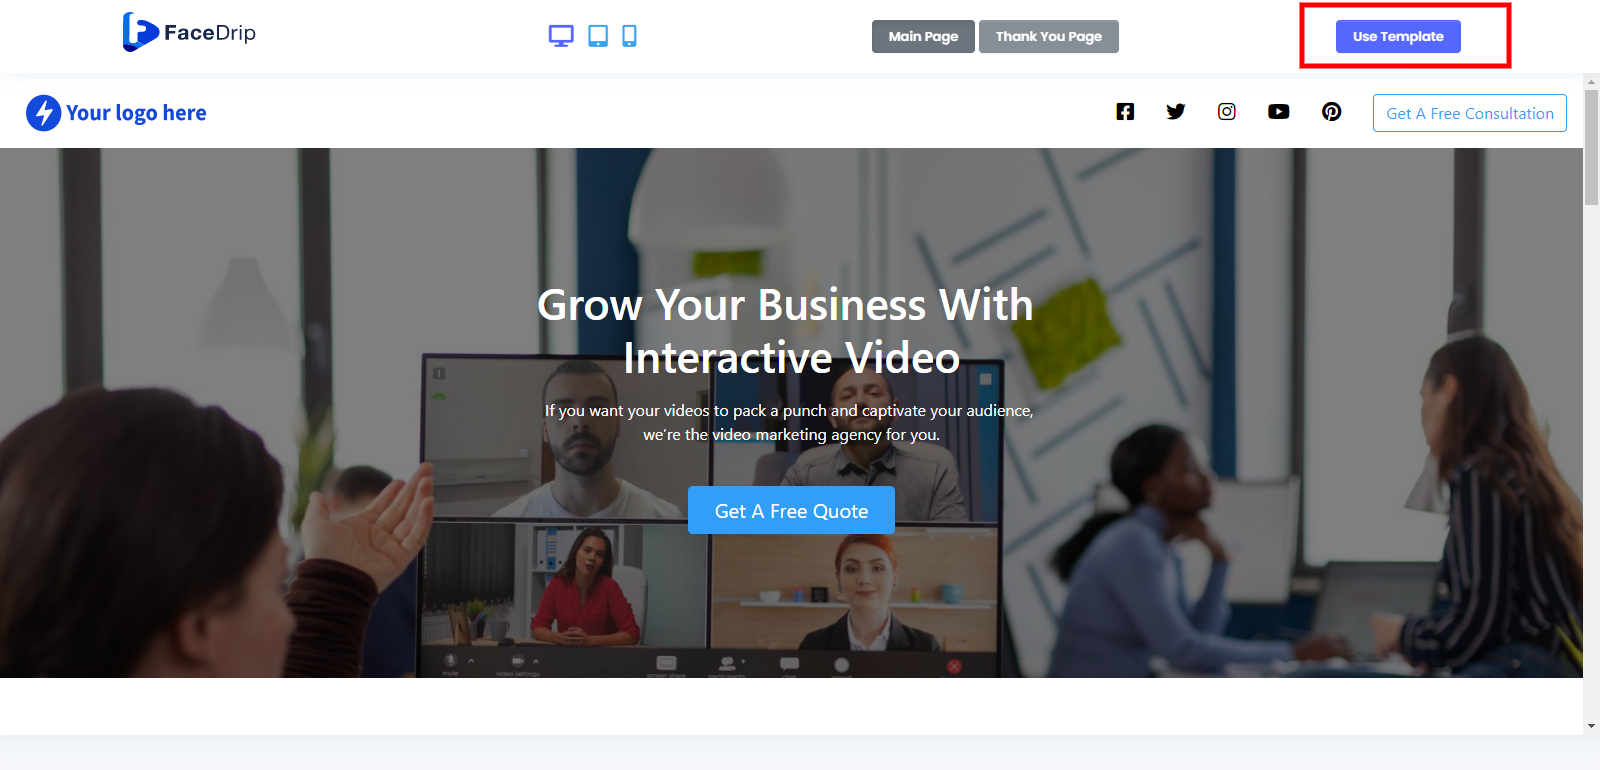
Step 4: Click on the preview blue button to Preview the agency website of your choice and click on the blue use template button
Preview Button
then click on the Blue use template button
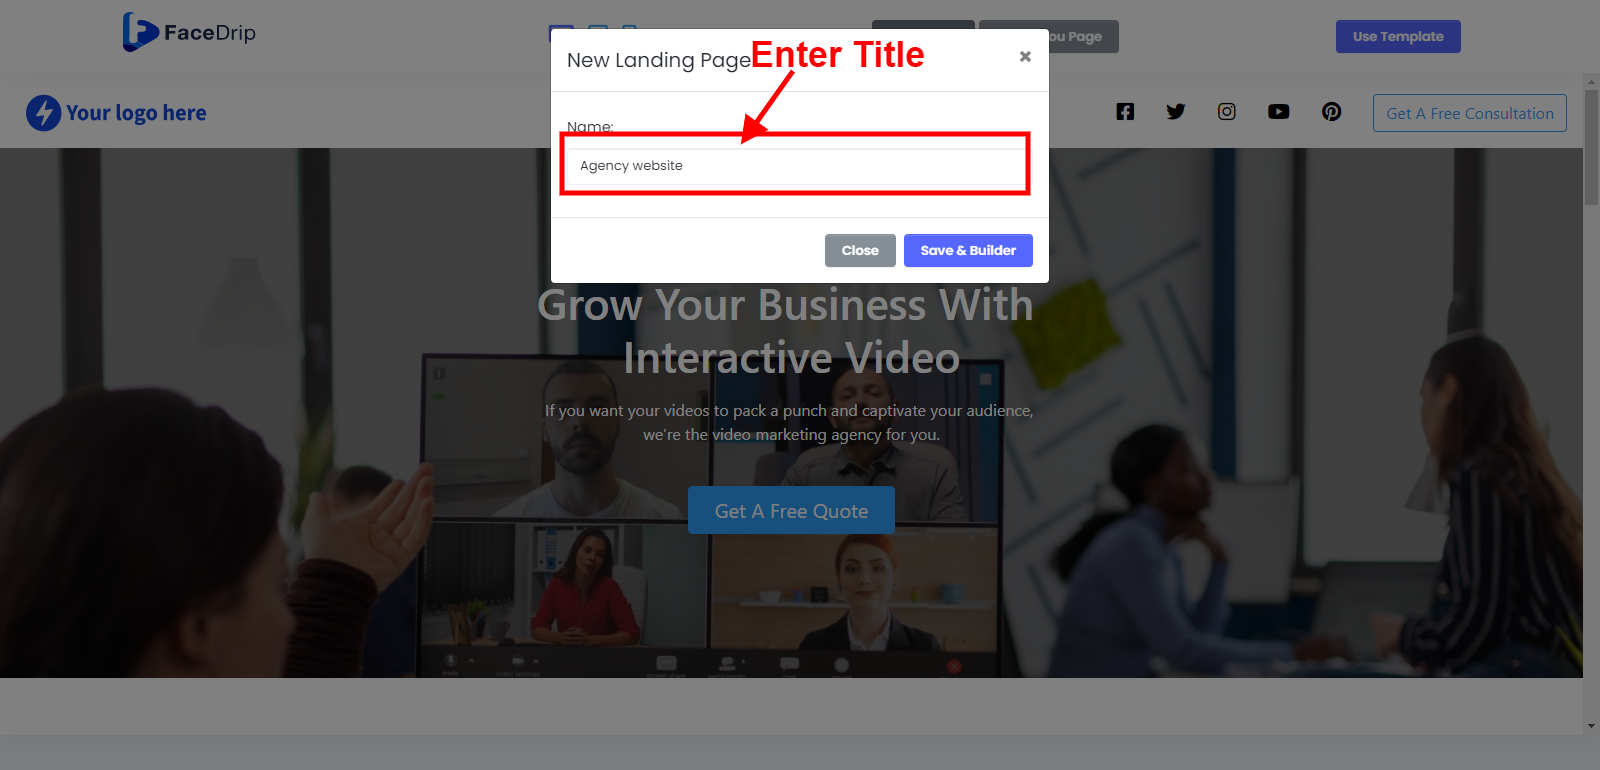
Step 5: Enter a title in the modal form and click the save & builder button
The template is saved and ready to use. And it takes you to your builder. You can start customizing to suit your business needs.
Here are instructions to follow to start customizing
In the opened landing page Builder, we have three (3) segments:
- The Top menu bar
- The Right side panel and
- The Body/Canvas
TOP MENU BAR: This is where you find the components for easy navigation through the landing page Builder. They are; View component, Preview, Fullscreen, Undo, Redo, Delete, Delete, Back Home, Save, and Publish.
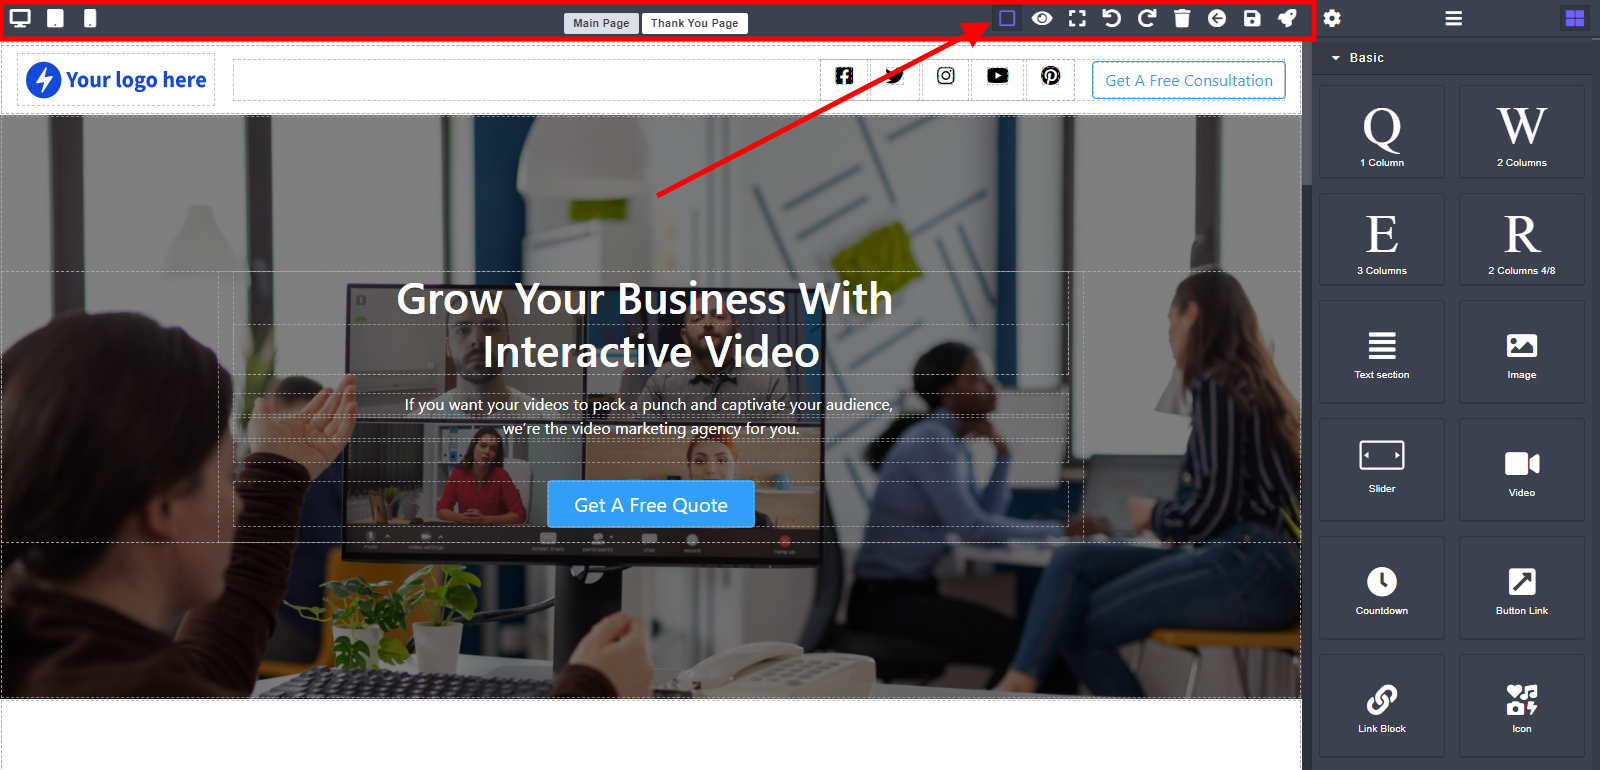
RIGHT SIDE PANEL: This panel is where you find the Style manager, Layer Manager, and Blocks.
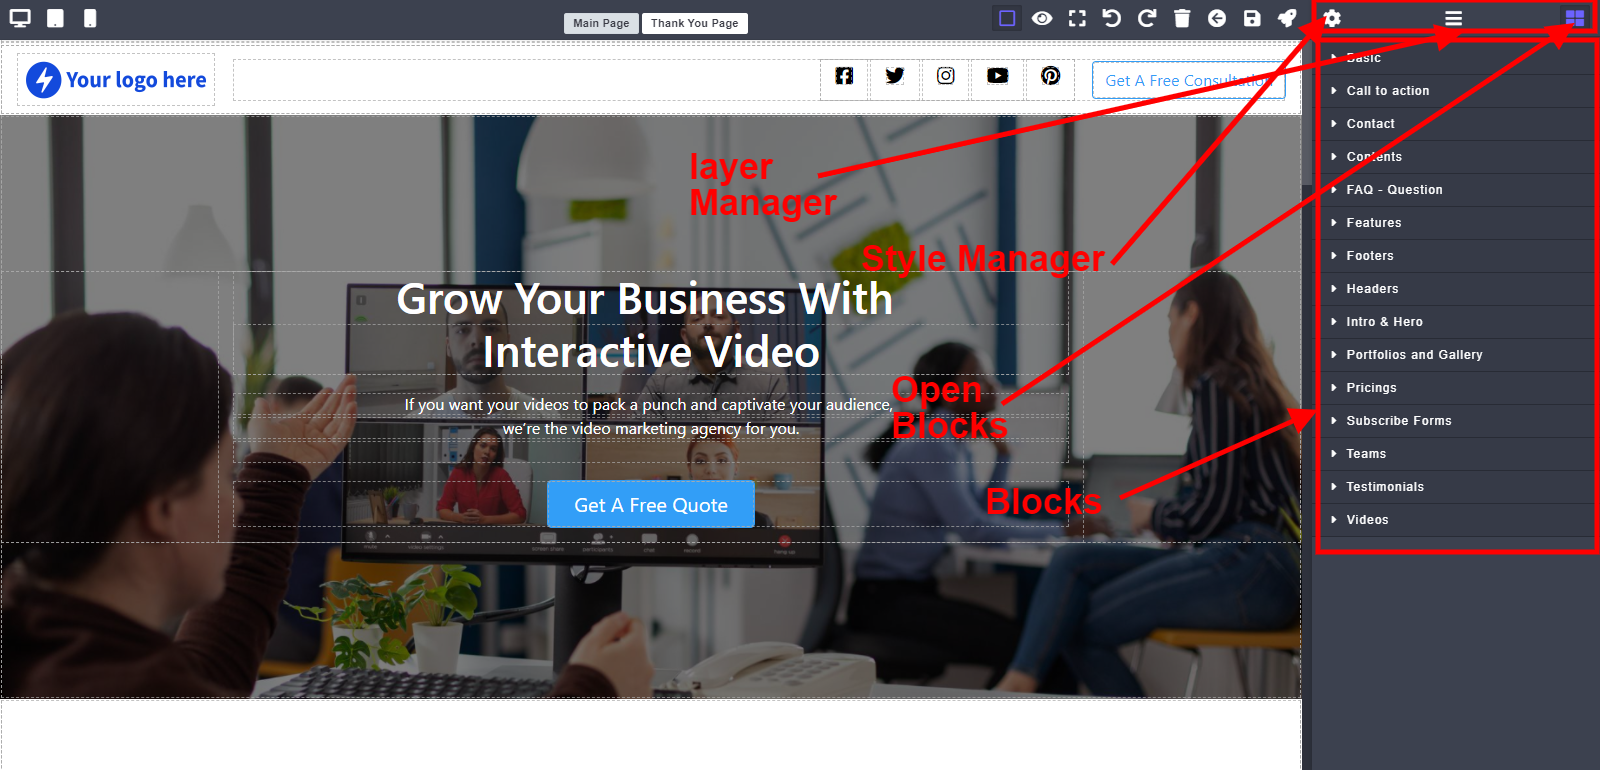
==> Style Manager- the style manager is selected on clicking in any of the Section on the body segment, the right-hand side panel shows the:

By the right hand sidebar, you will find:
Layout menu ( for editing the margin, Padding, and Width of the widgets on the body).
Typography menu (for editing text fonts, font color, font size, text decoration, font weight, letter spacing, line height, text alignment, and text shadow)
Background menu (for editing Background color and Background Layer)
Border and shadow menu (For editing box shadow, border width, border style, border color and border radius
==> Block- The block houses the various builder widgets such as; column widget, Text widget, Image widget, slides widget, countdown widget, Button link widget, link Block widget, icon widget, PayPal widget, stripe widget, custom code widget, forms widget, quote widget.

It also houses the various sections with different styling patterns and feature with which you can style any section on the body segment to suit your taste.
Click on the Block Icon to reveal the widgets.
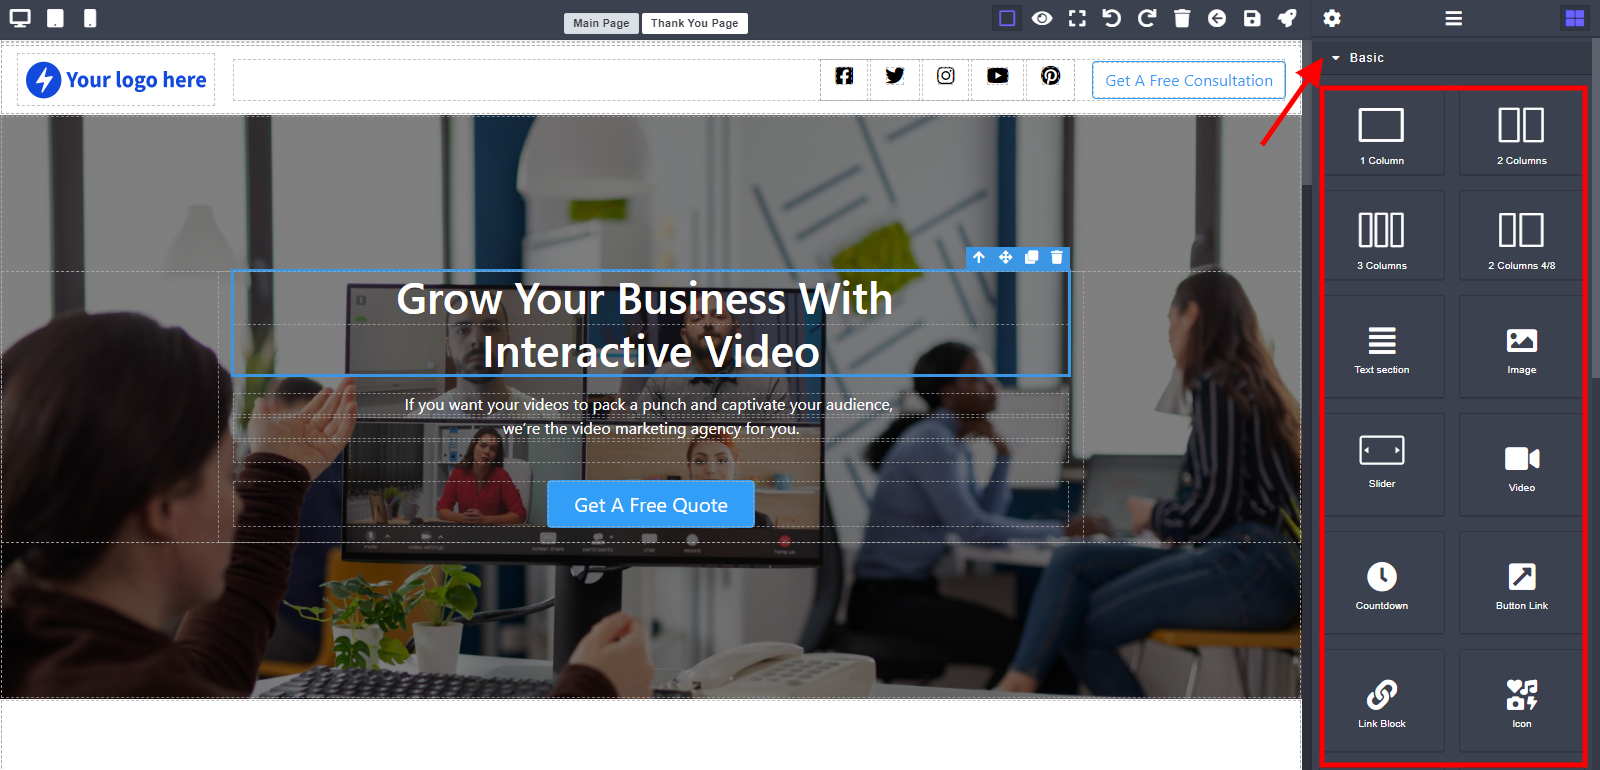
To use/move any of these widget or features to the Body/Canvas area, drag the particular widget and Drop on the section on the canvas.
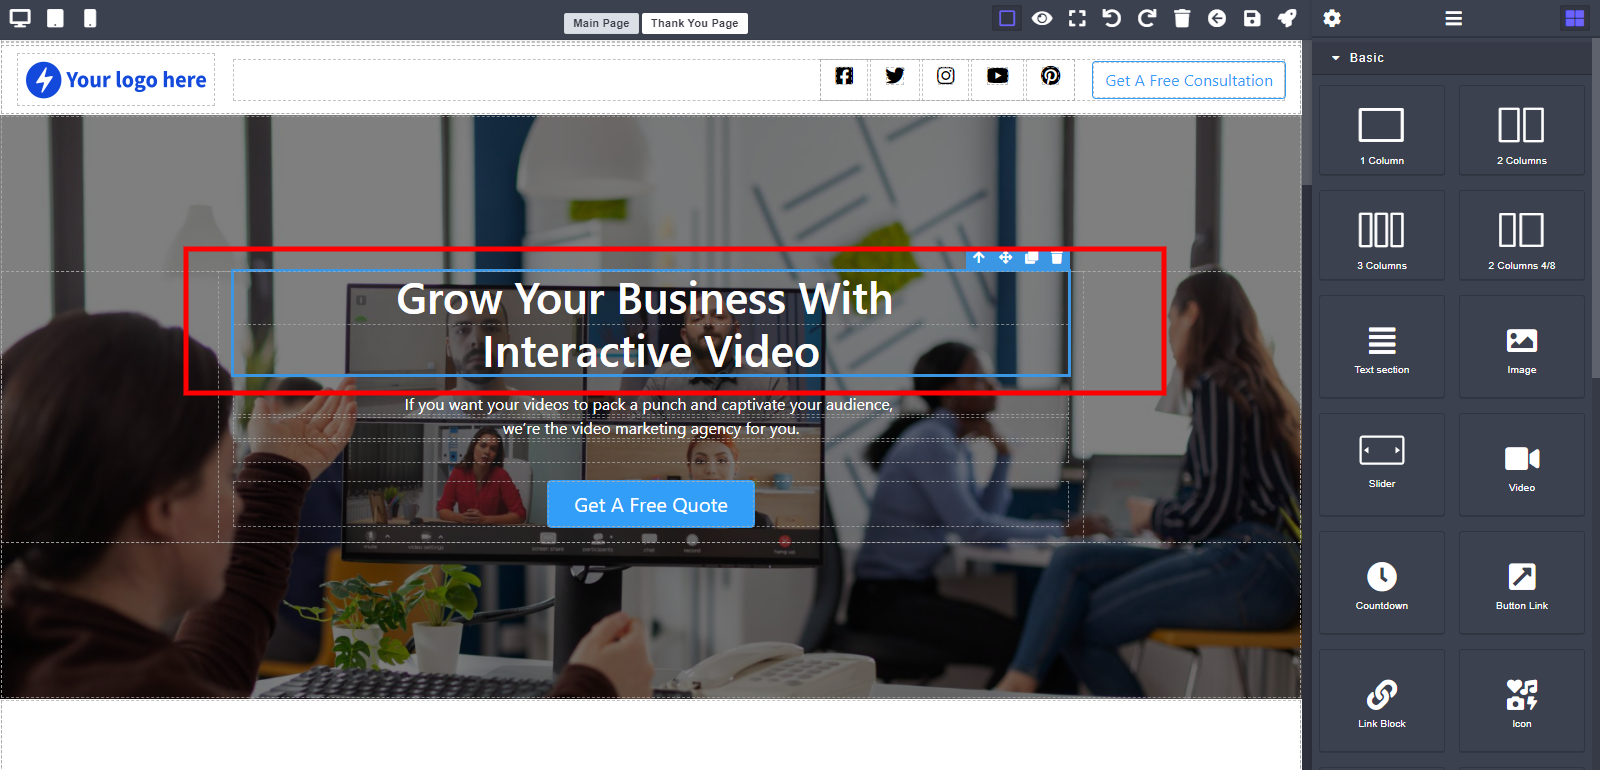
BODY/CANVAS: this is where widgets(text images, Colors etc.) are arranged into different sections to form/build your landing page. When any of the sections are clicked on, the side panel reveals the setting.
How to Update Custom Landing Pages on Facedrip
You will have to go through the same process to make your desired changes and first click on the save button, and then click on the publish button to update and save changes done.
How to Delete Custom Landing Pages on Facedrip
Step 1: On your dashboard, click on the landing page menu. You will be redirected to the landing page template dashboard.

Step 2: Select The Landing page you wish to delete from the list.
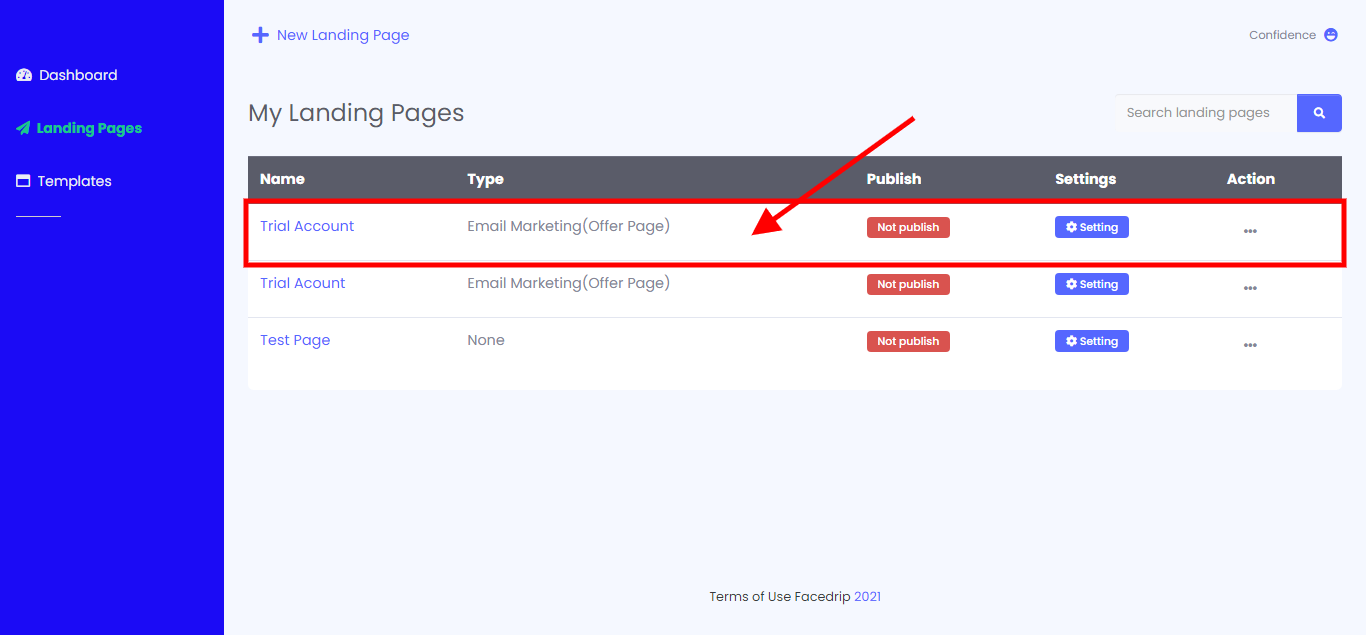
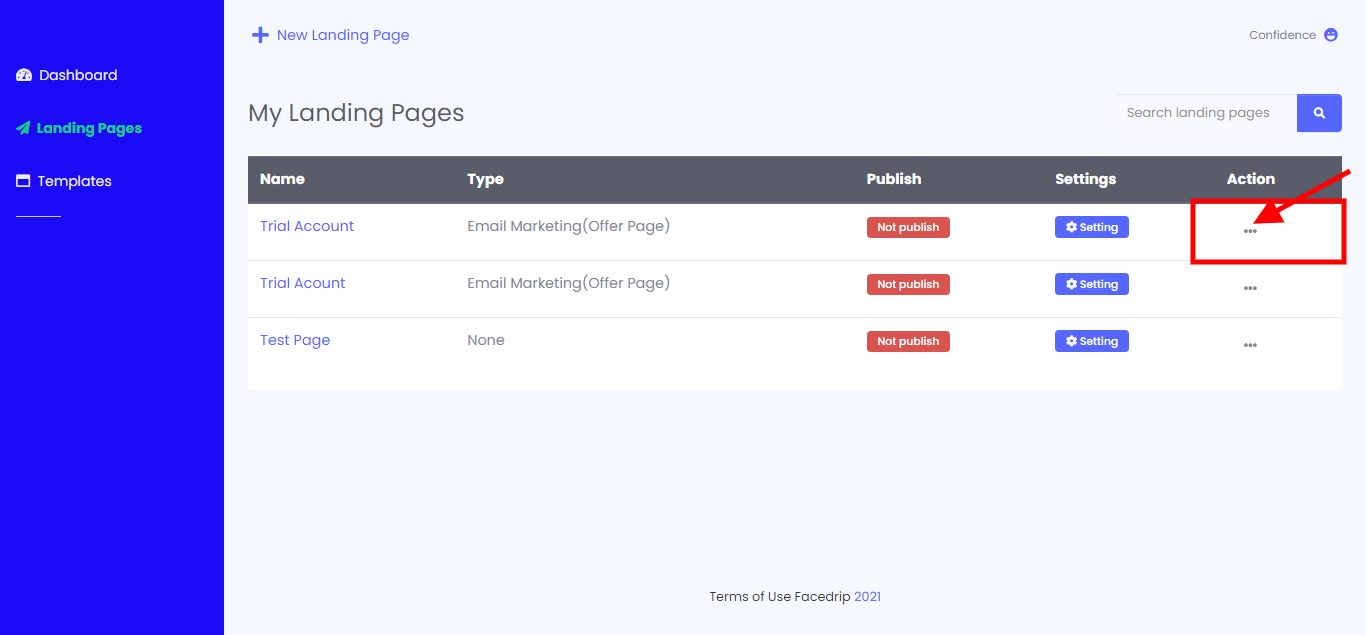
Step 3: Click on the three toggle button on the on the right hand side.
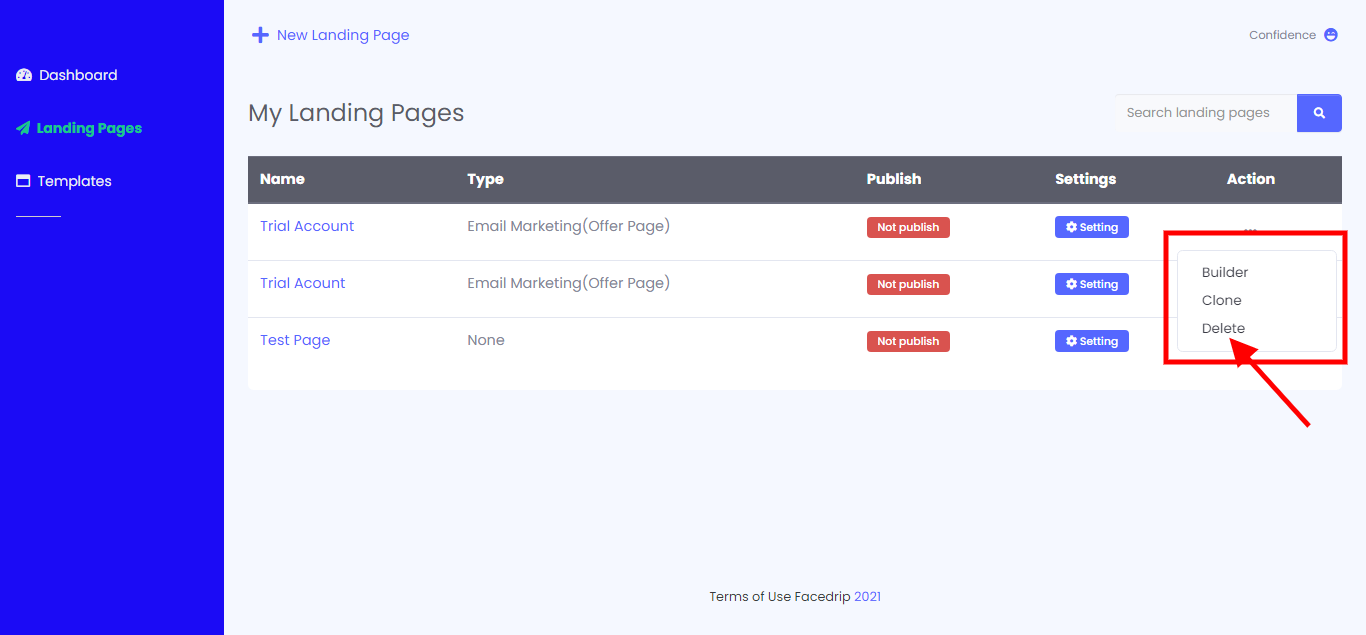
Step 4: Select “delete” on pop-up modal, and click “Ok” on the pop-up modal.
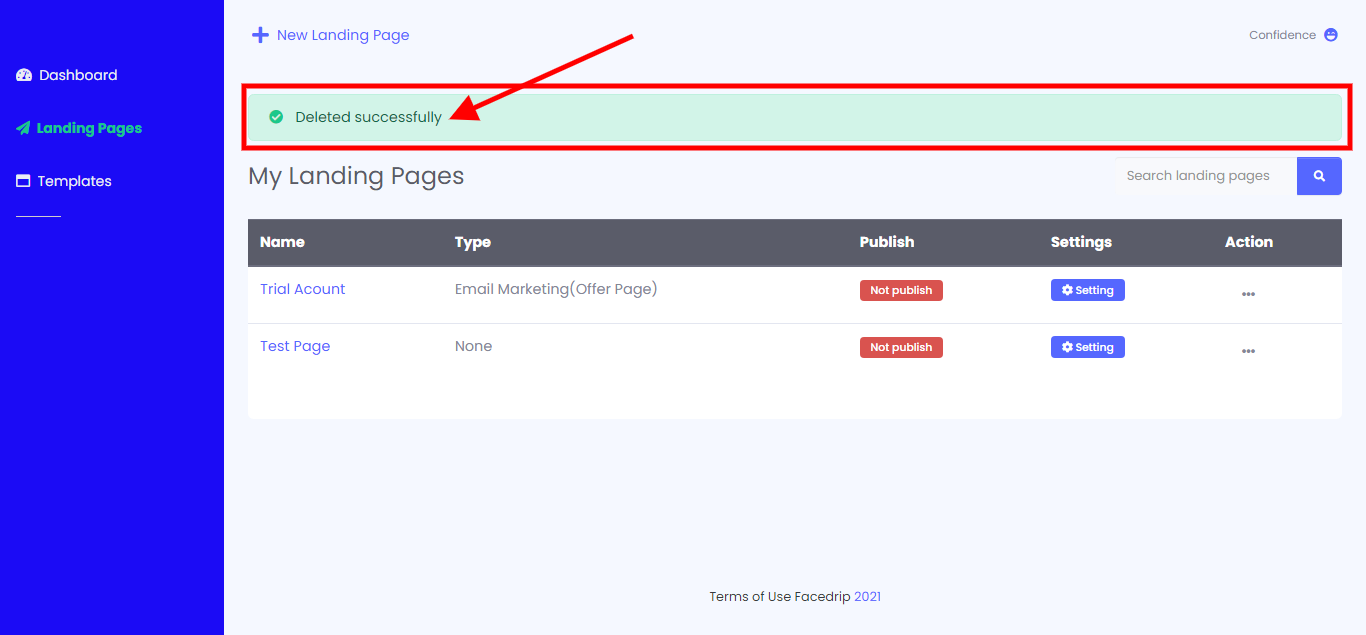
Step 5: The selected landing page is deleted successfully.
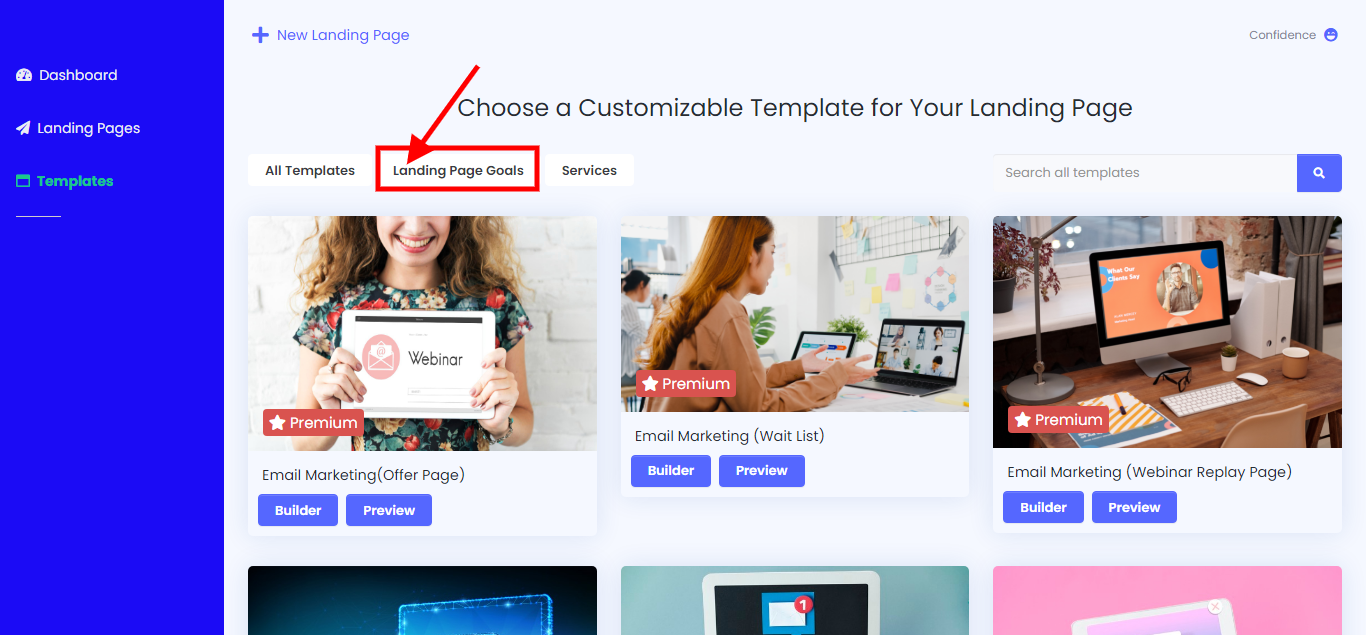
. Upon choosing your landing page goals, it will filter the different digital marketing services.
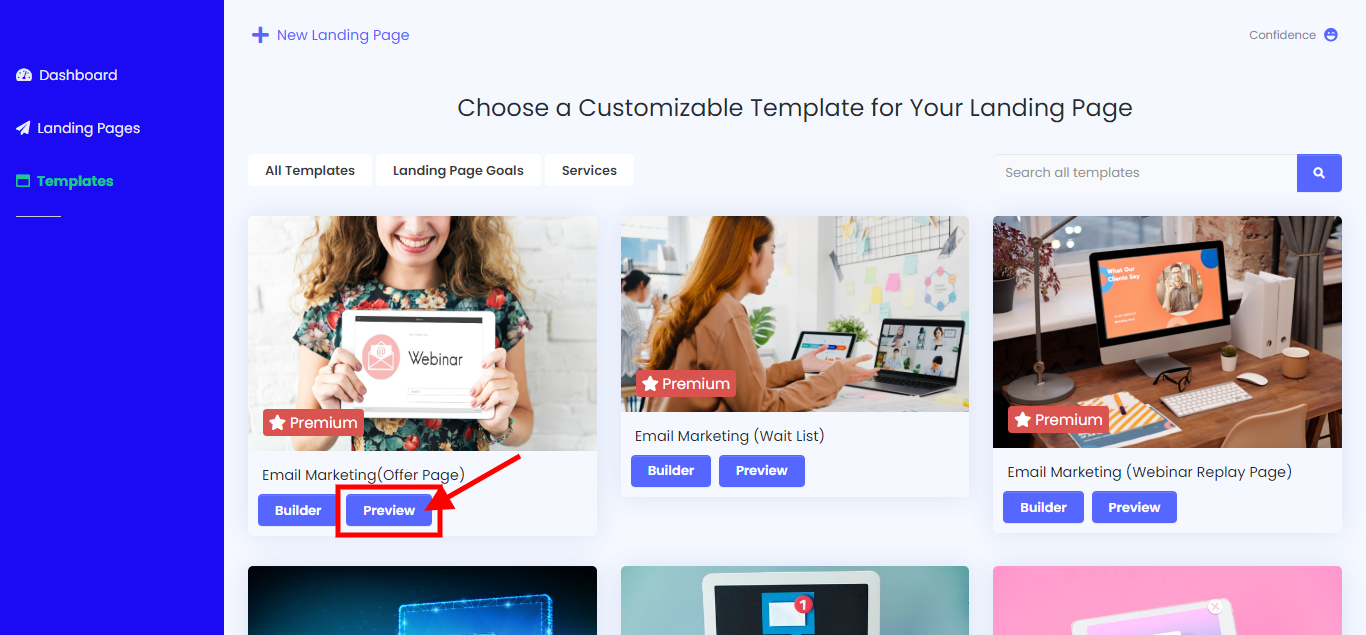
Step 4: Click on the preview blue button to Preview the landing pages for the digital marketing service of your choice and click on the blue use template button
Preview Button
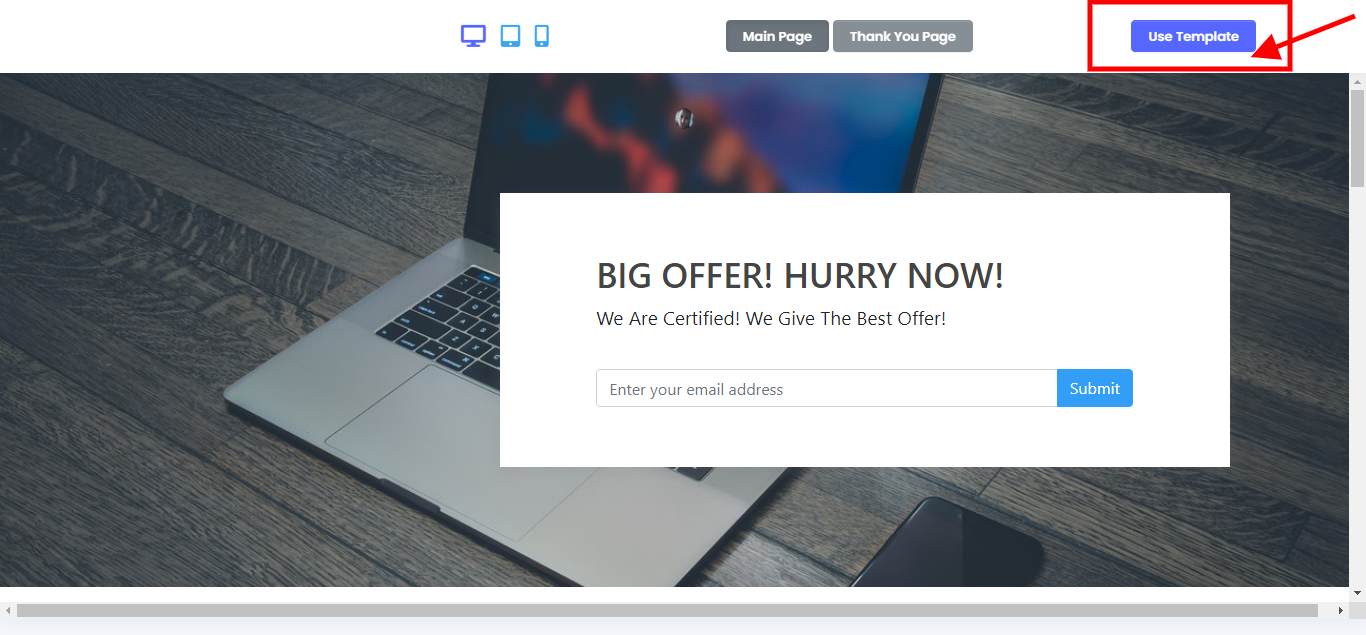
Blue use template button
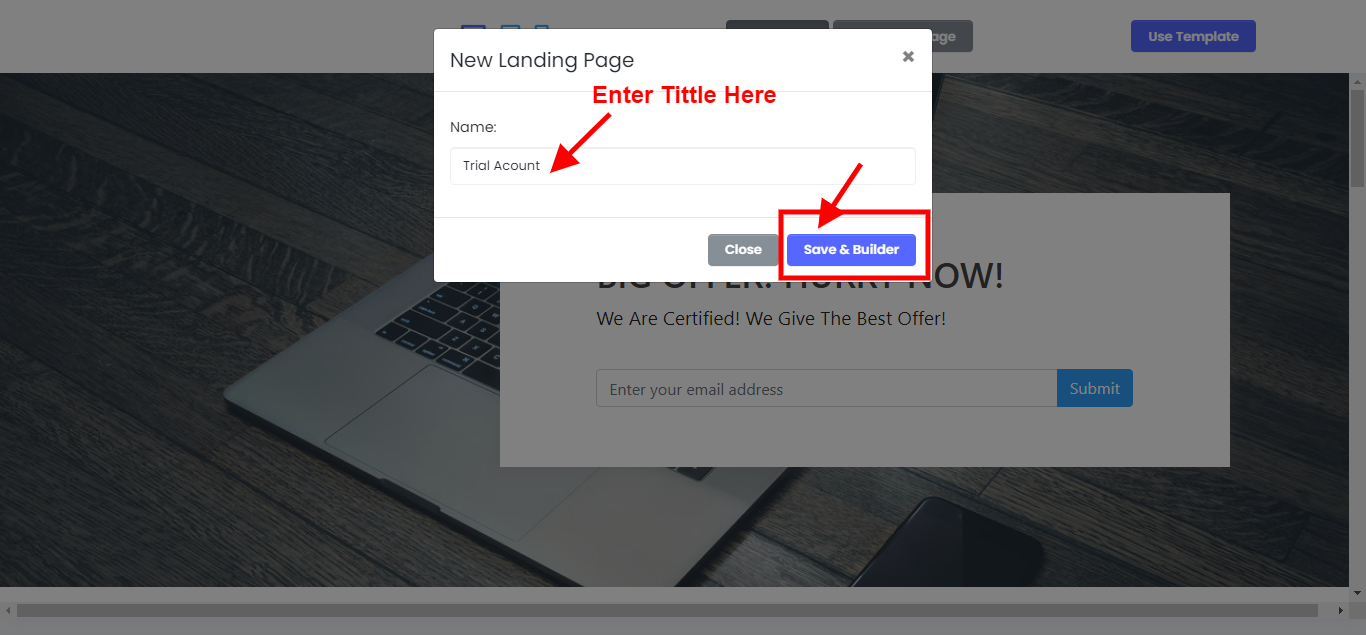
Step 5: Enter a title in the modal form and click the save & builder button
The template is saved and ready to use. And it takes you to your builder. You can start customizing to suit your business needs.
Here are instructions to follow to start customizing
In the opened landing page Builder, we have three (3) segments:
- The Top menu bar
- The Right side panel and
- The Body/Canvas
TOP MENU BAR: This is where you find the components for easy navigation through the landing page Builder. They are; View component, Preview, Full screen, Undo, Redo, Delete, Delete, Back Home, Save, and Publish.
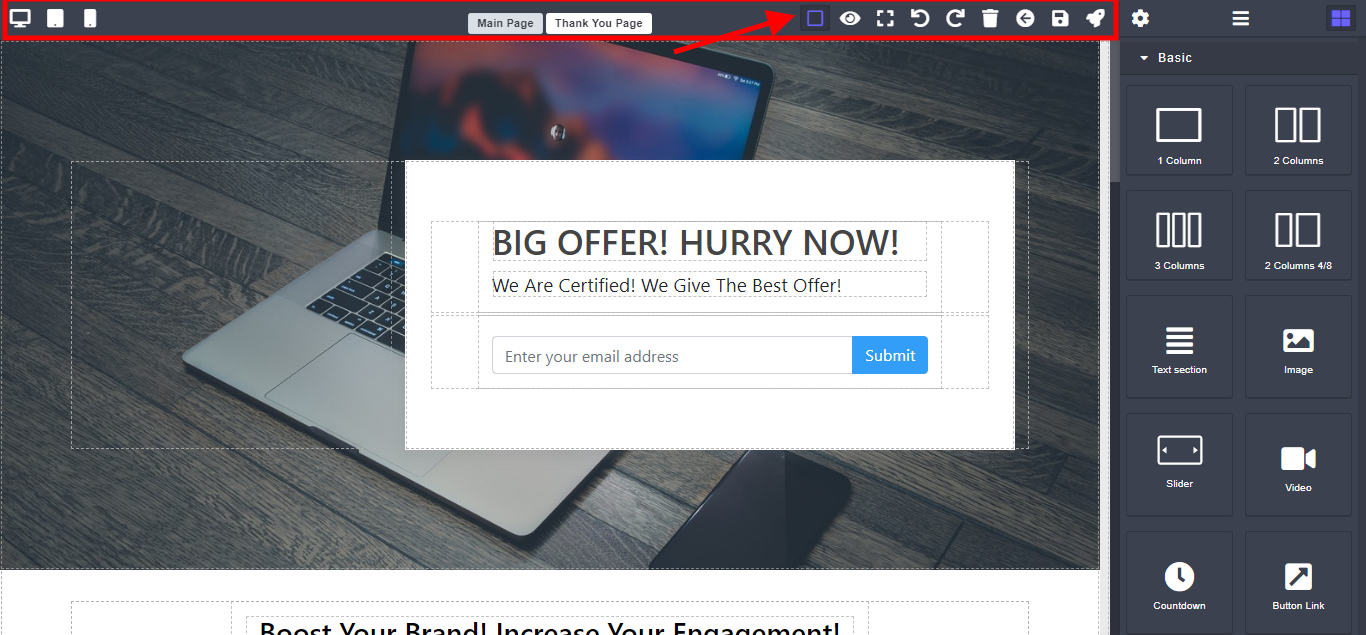
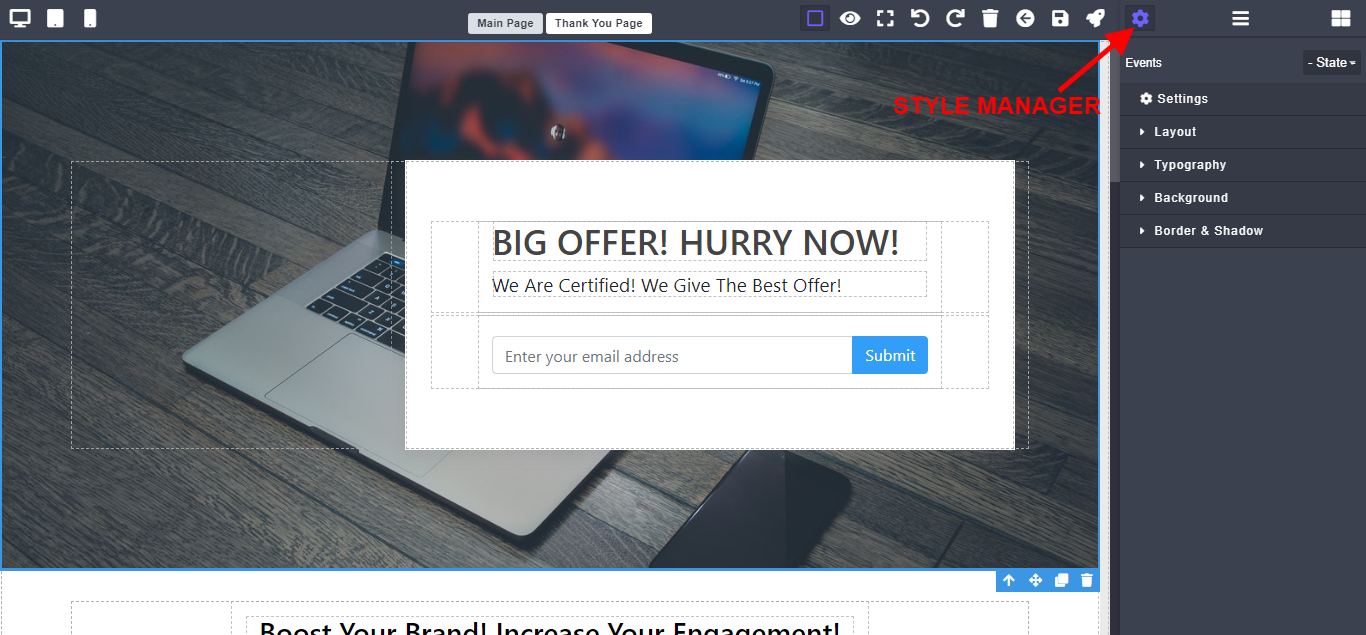
RIGHT SIDE PANEL: This panel is where you find the Style manager, Layer Manager and Blocks.
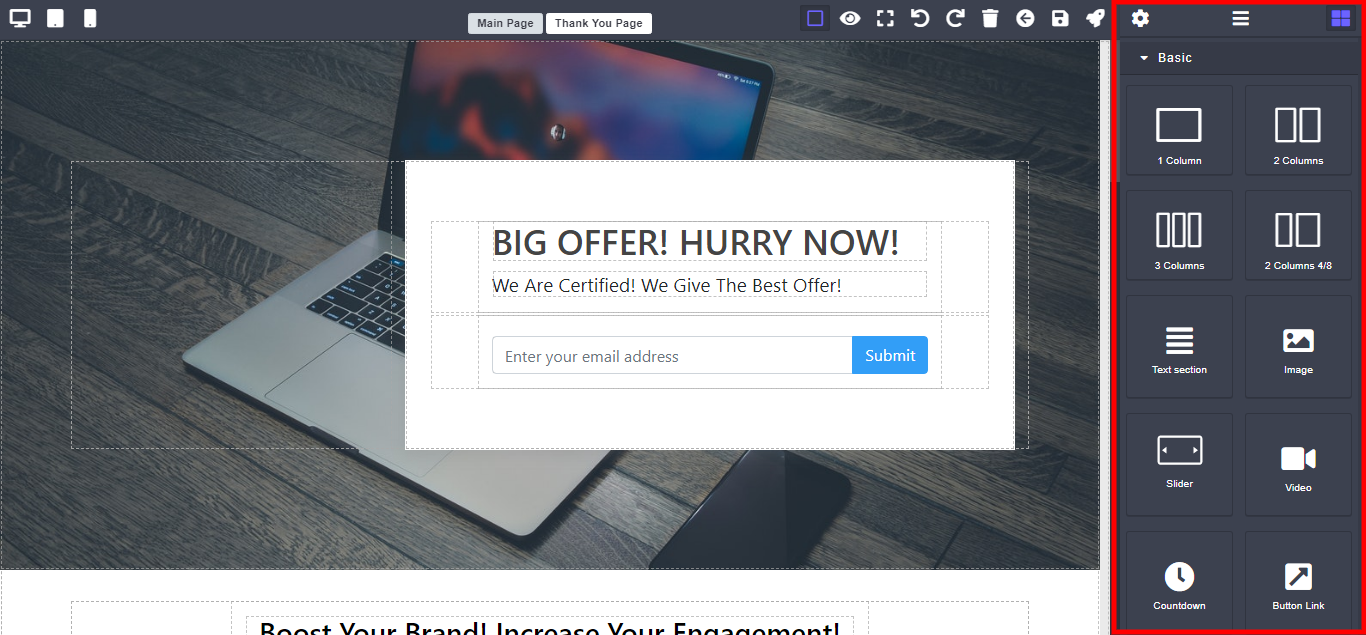
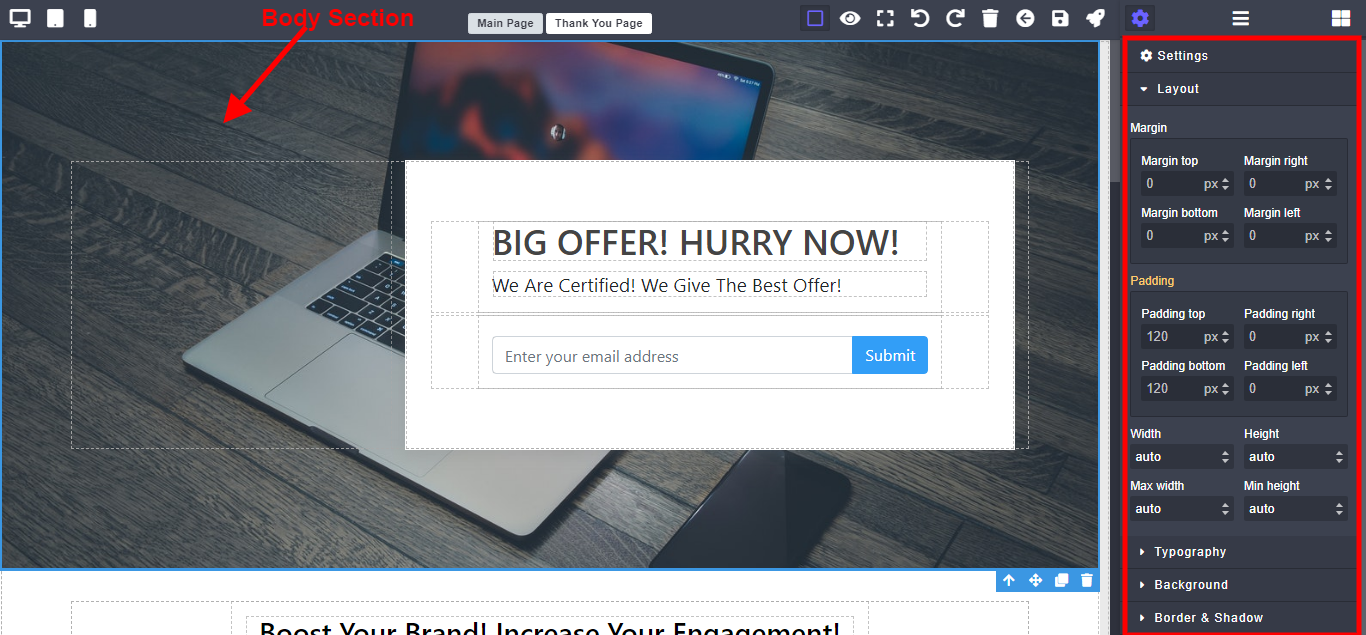
Style Manager- the style manager is selected on clicking on any of the section on the body segment, the right hand side panel shows the:
Layout menu ( for editing the margin, Padding, and Width of the widgets on the body).
Typography menu (for editing text fonts, font color, font size, text decoration, font weight, letter spacing, line height, text alignment, and text shadow)
Background menu (for editing Background color and Background Layer)
Border and shadow menu (For editing box shadow, border width, border style, border color and border radius)
N/B===>This is the style manager
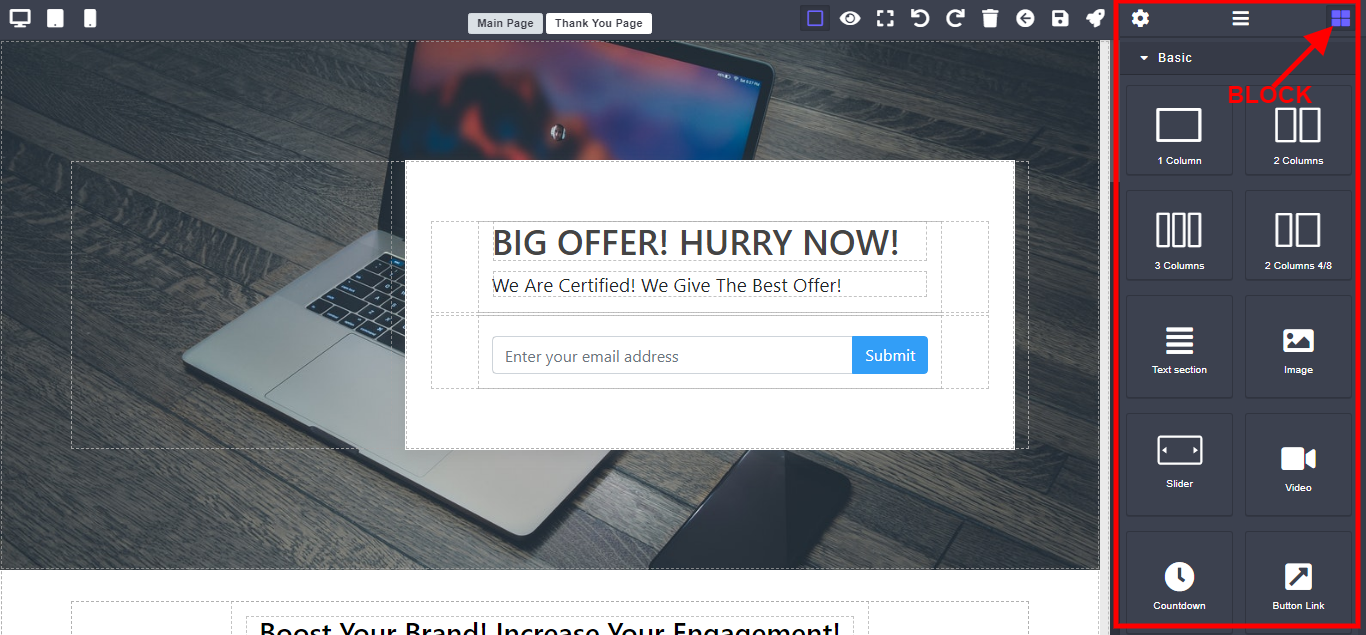
Block- The block houses the various builder widgets such as; column widget, Text widget, Image widget, slides widget, countdown widget, Button link widget, link Block widget, icon widget, PayPal widget, stripe widget, custom code widget, forms widget, quote widget.
It also houses the various sections with different styling patterns and feature with which you can style any section on the body segment to suit your taste.
Click on the Block Icon to reveal the widgets.
To use/move any of these widget or feature to the Body/Canvas area, drag the particular widget and Drop on the section on the canvas.
BODY/CANVAS: this is where widgets(text images, Colors etc.) are arranged into different sections to form/build your landing page. When any of the sections are clicked on, the side panel revels the setting.
How to Update Custom Landing Pages on Facedrip
You will have to go through the same process to make your desired changes and first click on the save button, and then click on the publish button to update and save changes done.
How to Delete Custom Landing Pages on Facedrip
Step 1: On your dashboard, click on the landing page menu. You will be redirected to the landing page template dashboard.

Step 2: Select The Landing page you wish to delete from the list.

Step 3: Click on the three toggle button on the on the right hand side.

Step 4: Select “delete” on pop-up modal, and click “Ok” on the pop-up modal.

Step 5: The selected landing page is deleted successfully.

