Facedrip integration with Autoklose allows you to send trackable video messages using blank or a default template and get contact level activity reporting.
But first, you must Install Facedrip Chrome Extension from the Chrome store and sign in to your Facedrip account, then log in to the extension.
Kindly follow this link on how to install facedrip extension.
Kindly follow this link on how to login to your facedrip extension
How To Send Trackable Video Messages In Autoklose Using Blank Template
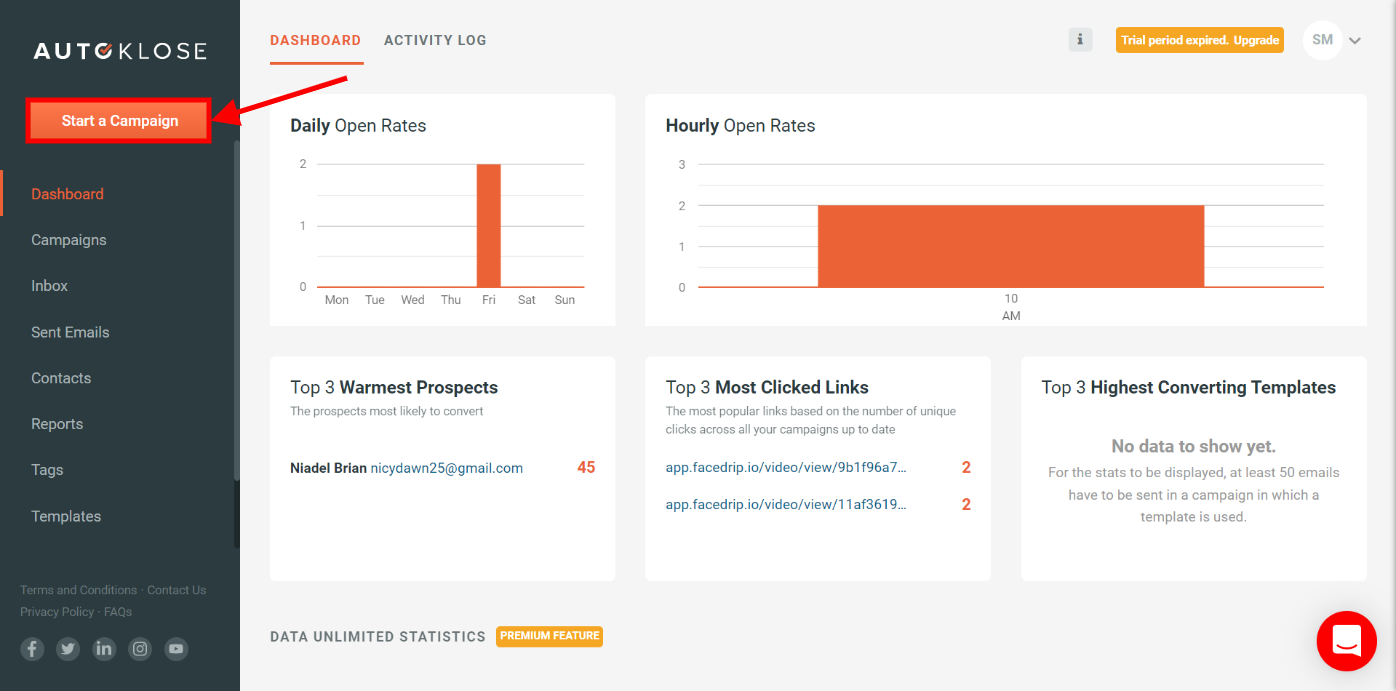
Step 1: Go to your Autoklose dashboard, click on the ‘start a campaign’ button and you will be redirected to the campaign settings page.
Step 2: Enter respective details and select preferred options for the campaign settings section and click the “next step” button as shown below;
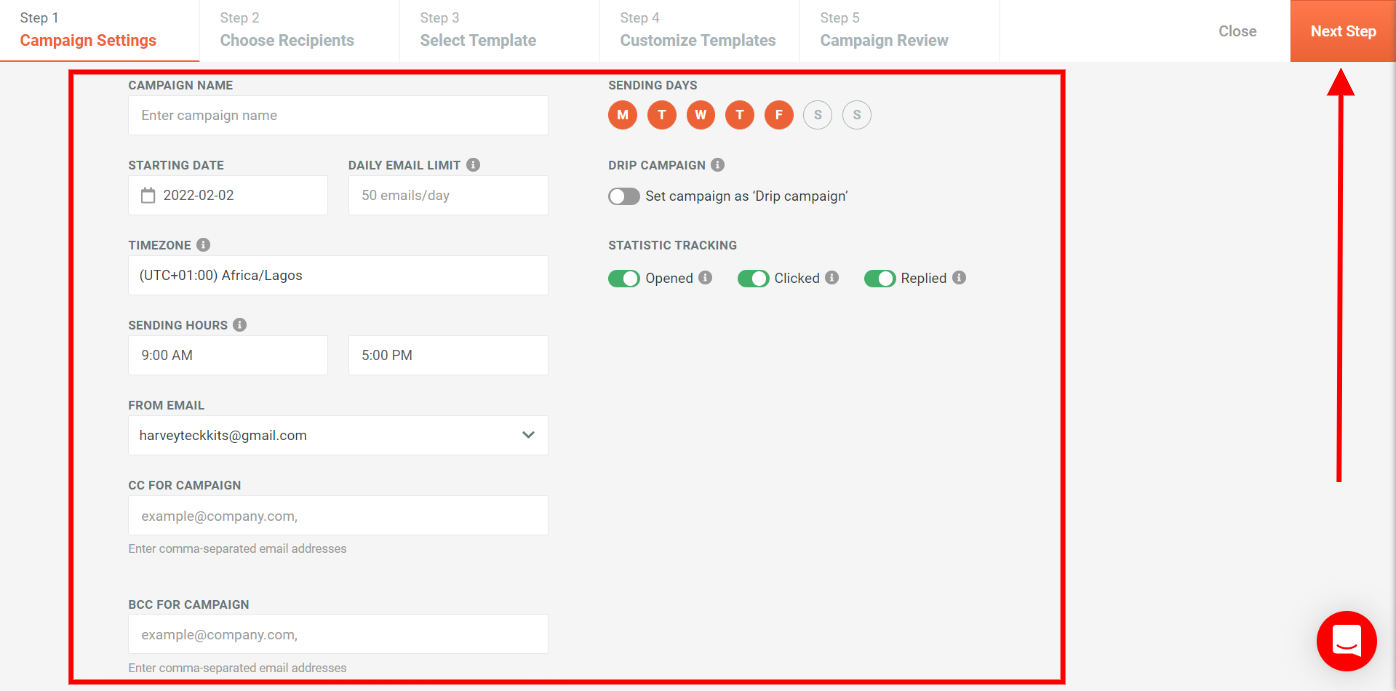
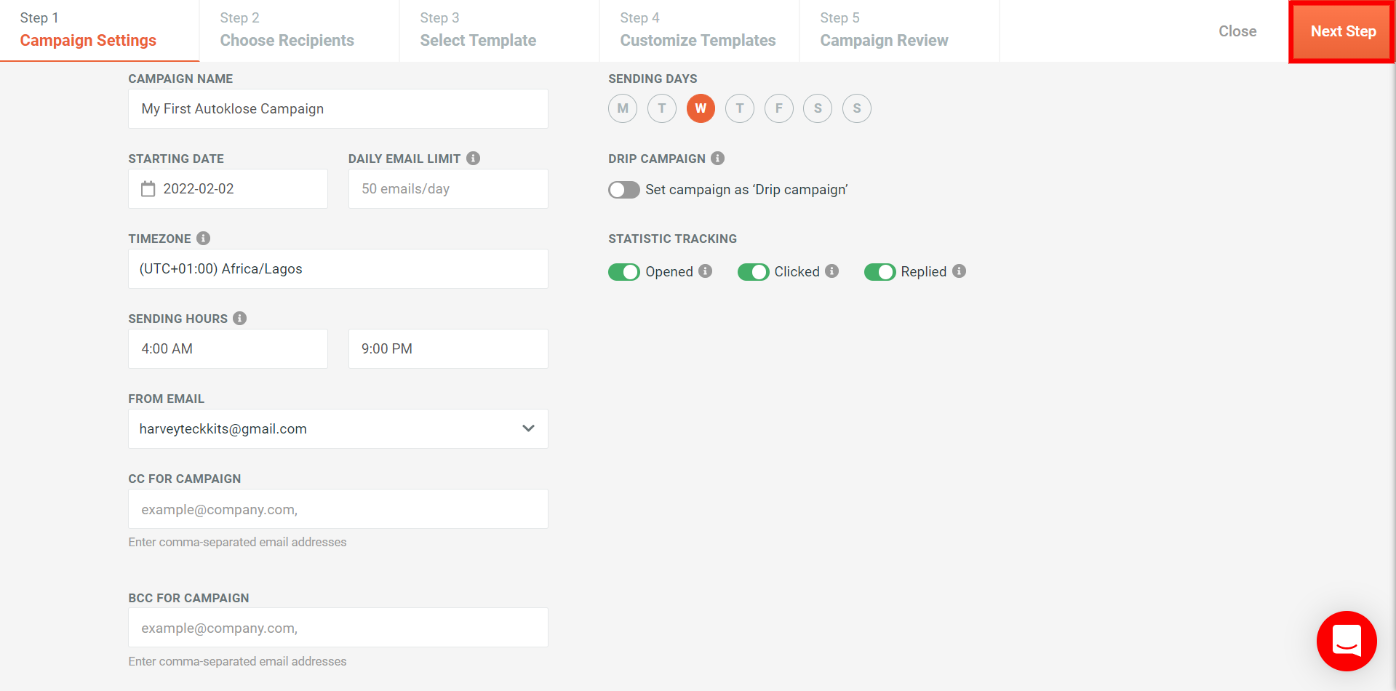
N/B: It is optional to enter details in the “CC for campaign” and “BCC for campaign” field
For the CC field(“cc” means carbon copy): enter the email addresses of the people you want to know about the email (remember dat everyone will see their names)
For the BCC field (“bcc” means blind carbon copy): enter the email addresses of the people you want to know about the email but not announce to everyone else dat they are getting a copy
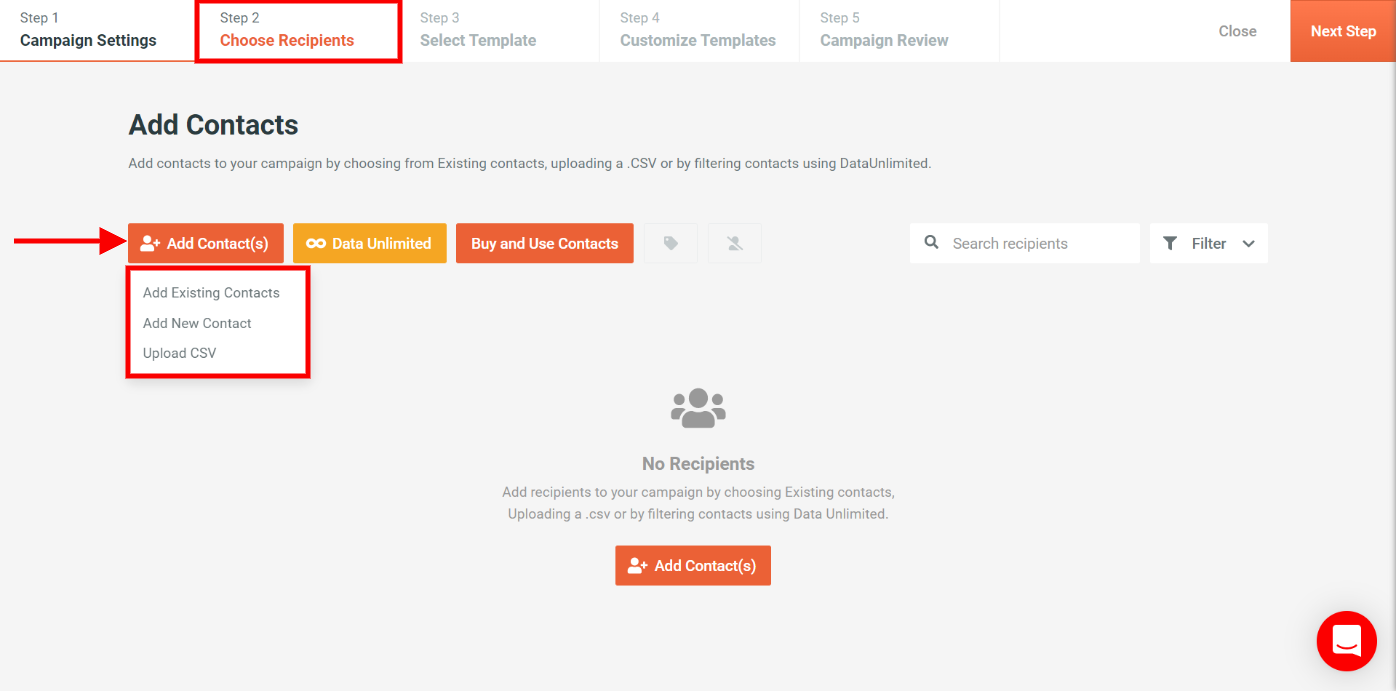
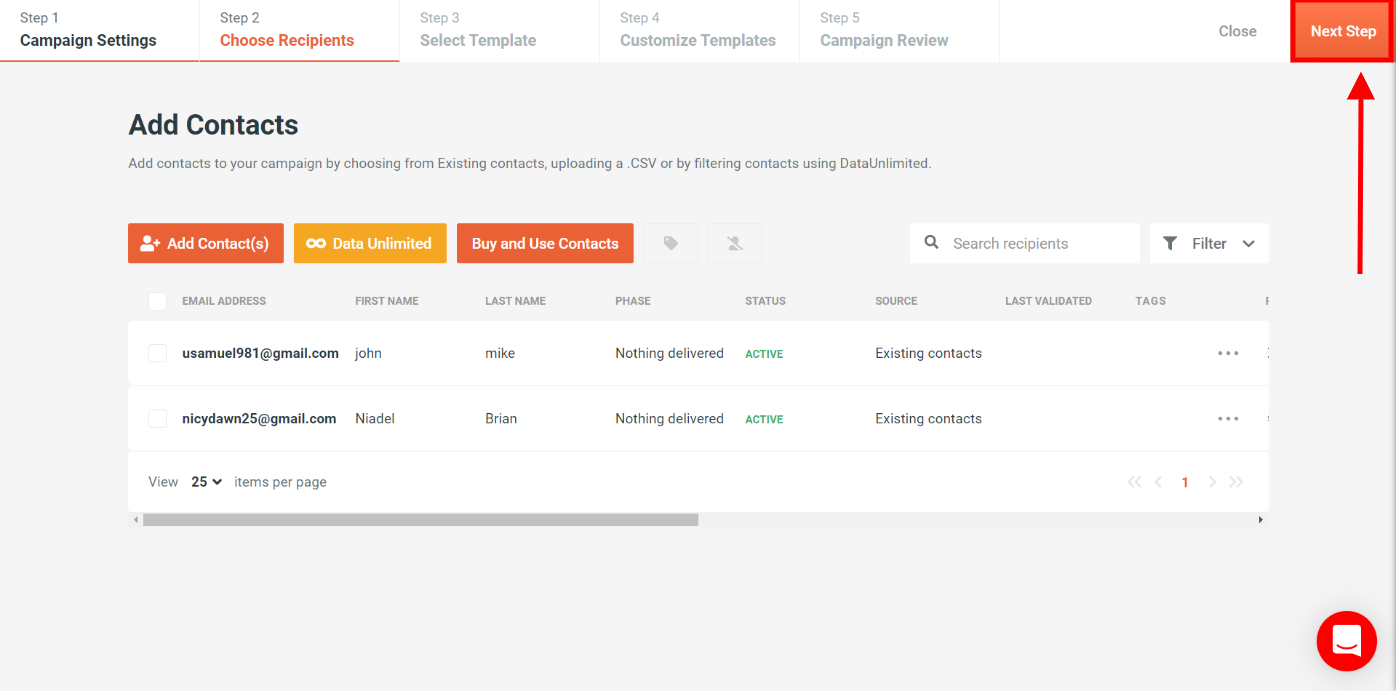
Step 3: In the “Choose Recipients” tab click the “add contact button” to select your preferred option from the dropdown to add contacts then click the “next step” button as shown below;
Step 4: In the “select template tab” click on the “Blank Template” button and you will be redirected to the “Customize Templates” campaign step where you will see the facedrip extension icon in the toolbar section.
![]()
![]()
Step 5: Enter your preferred subject and enter your preferred description in the text box.
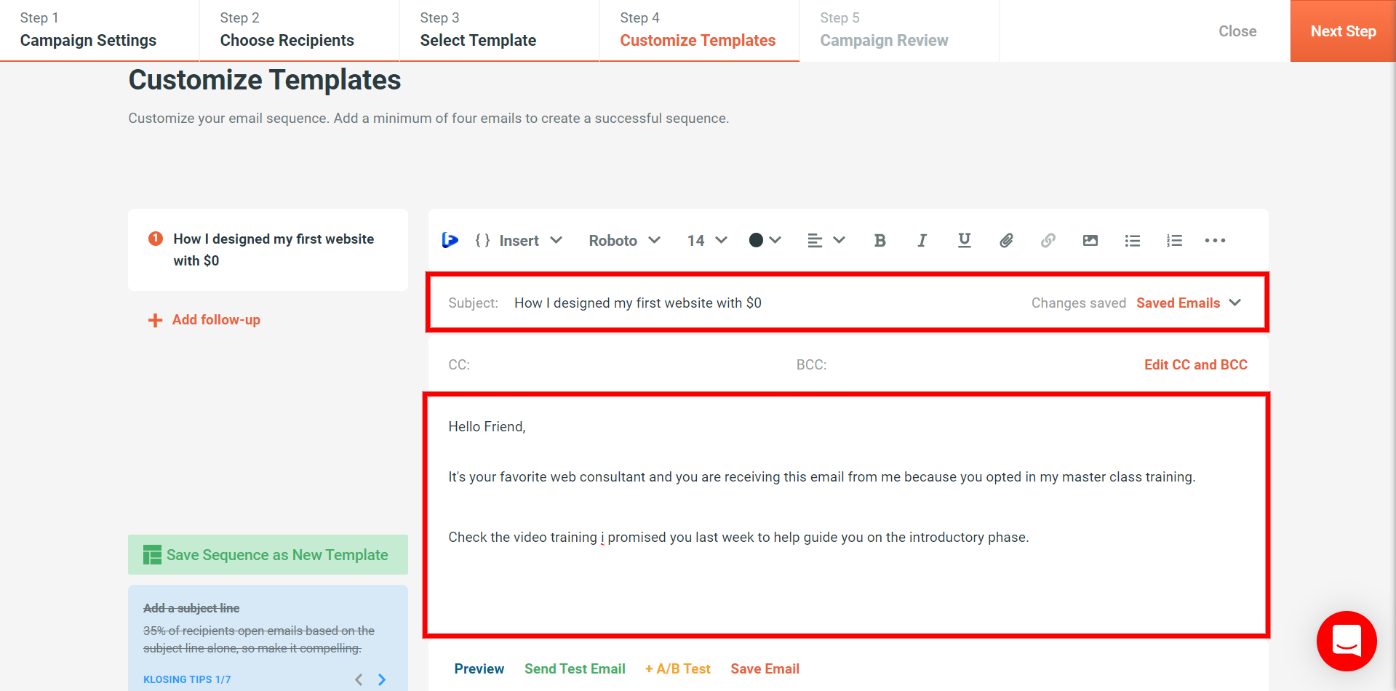
After entering your preferred description in the text box , click the facedrip icon in the toolbar section as shown below
![]()
N/B: It is optional to enter details in the “CC for campaign” and “BCC for campaign” field
For the CC field(“cc” means carbon copy): enter the email addresses of the people you want to know about the email (remember dat everyone will see their names)
For the BCC field (“bcc” means blind carbon copy): enter the email addresses of the people you want to know about the email but not announce to everyone else dat they are getting a copy
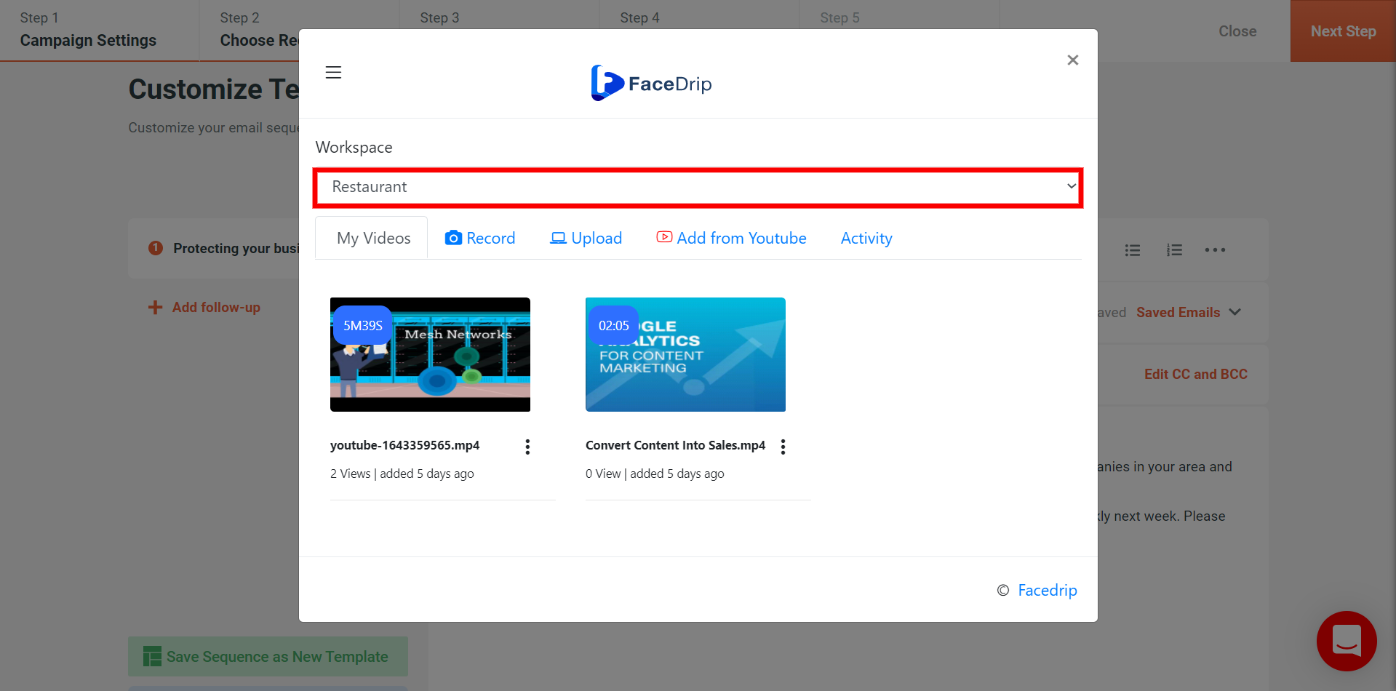
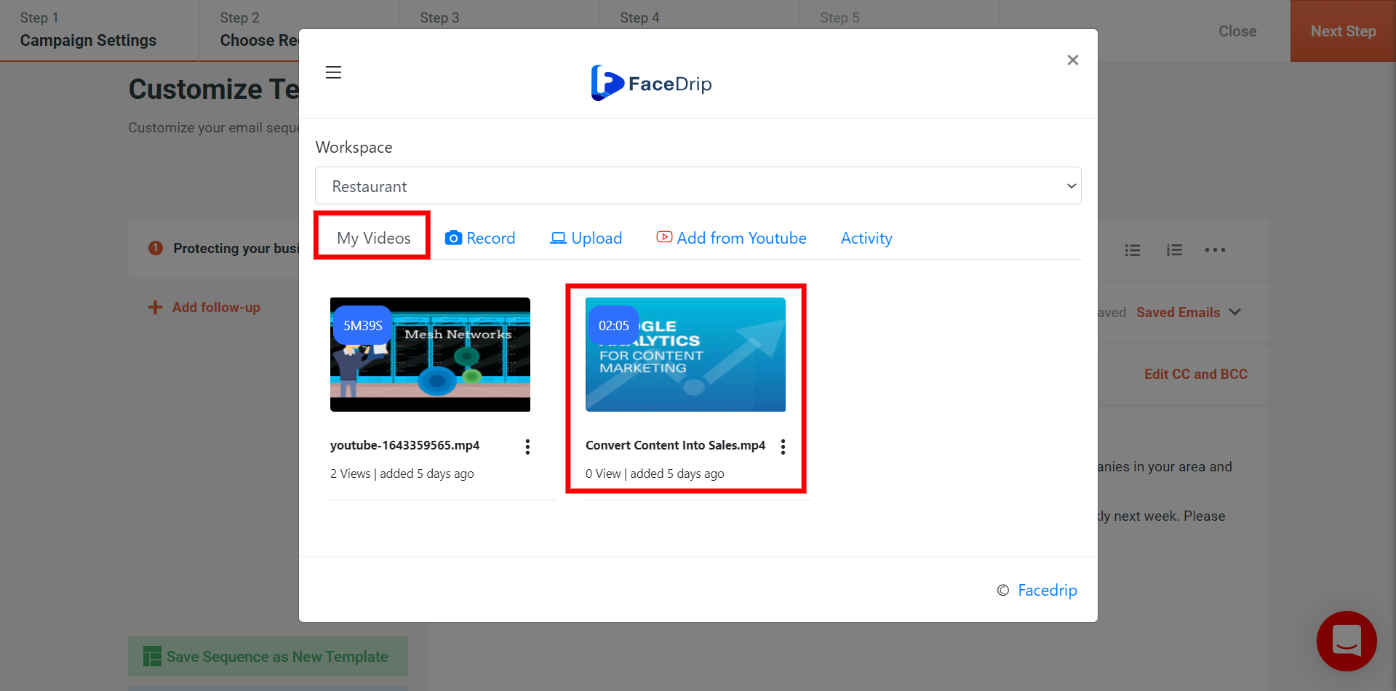
Step 6: After clicking the ‘facedrip extension icon’ a pop-up modal will appear where you will have the following option to;
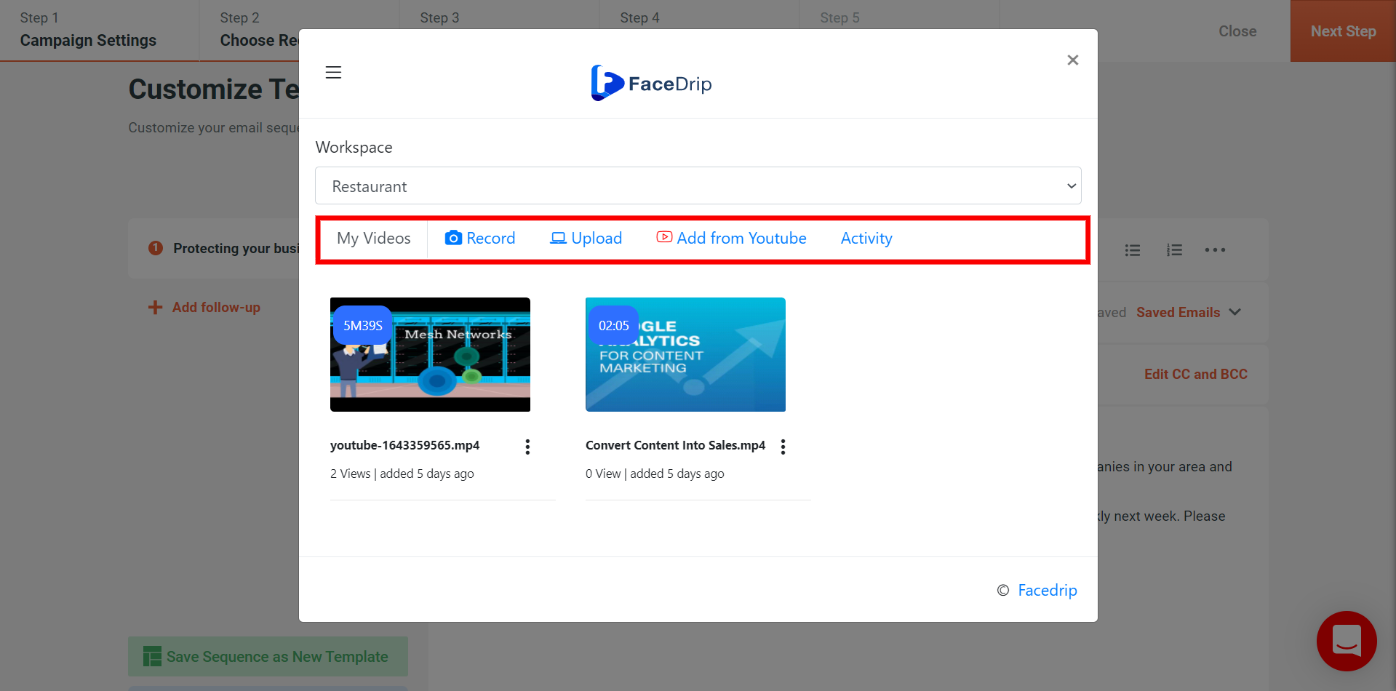
- Select your preferred workspace
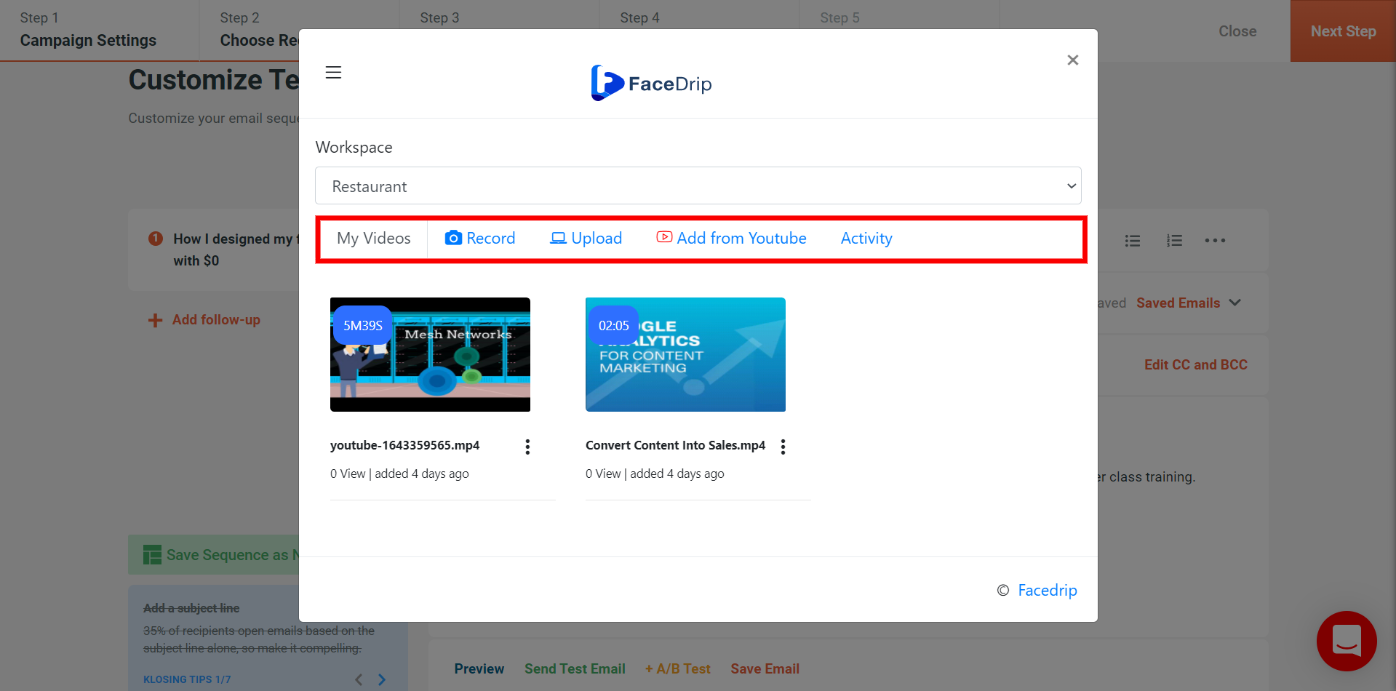
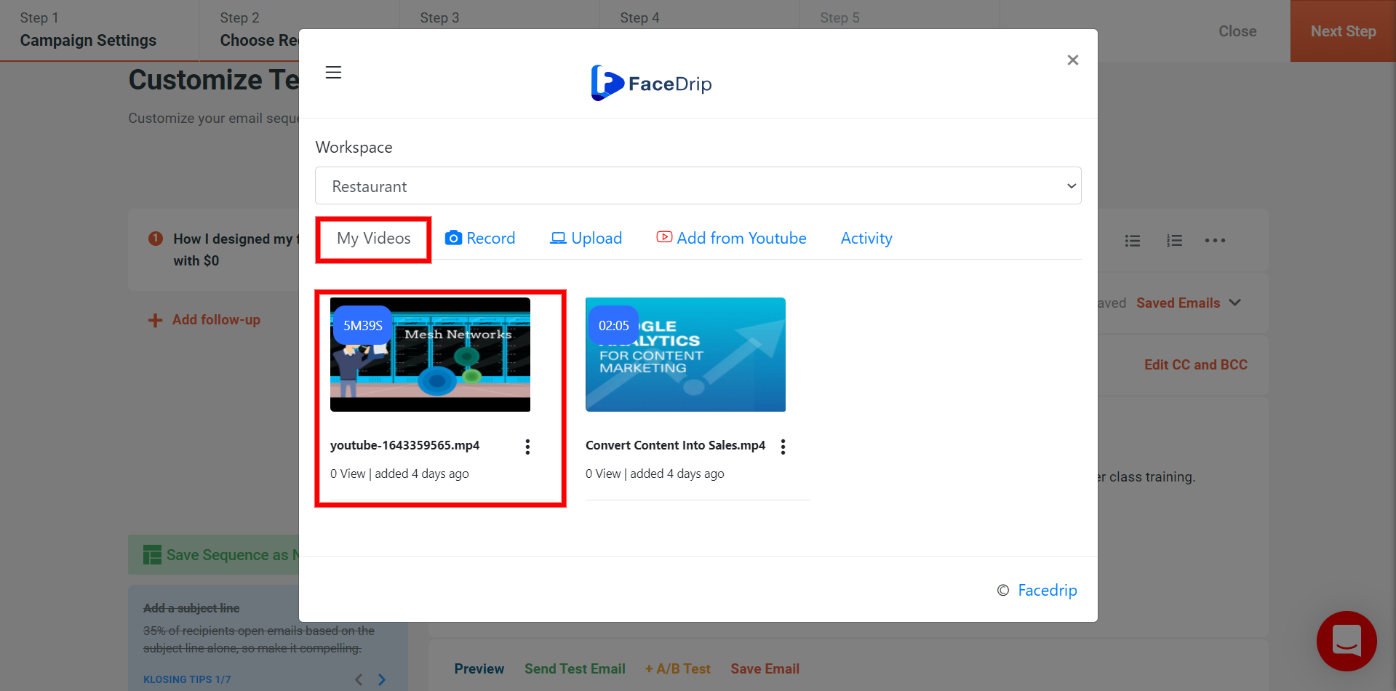
- Select any of the video upload option such as; already existing videos (my video tab), record a new video, upload a new video, add video from youtube and also view the activity tab.
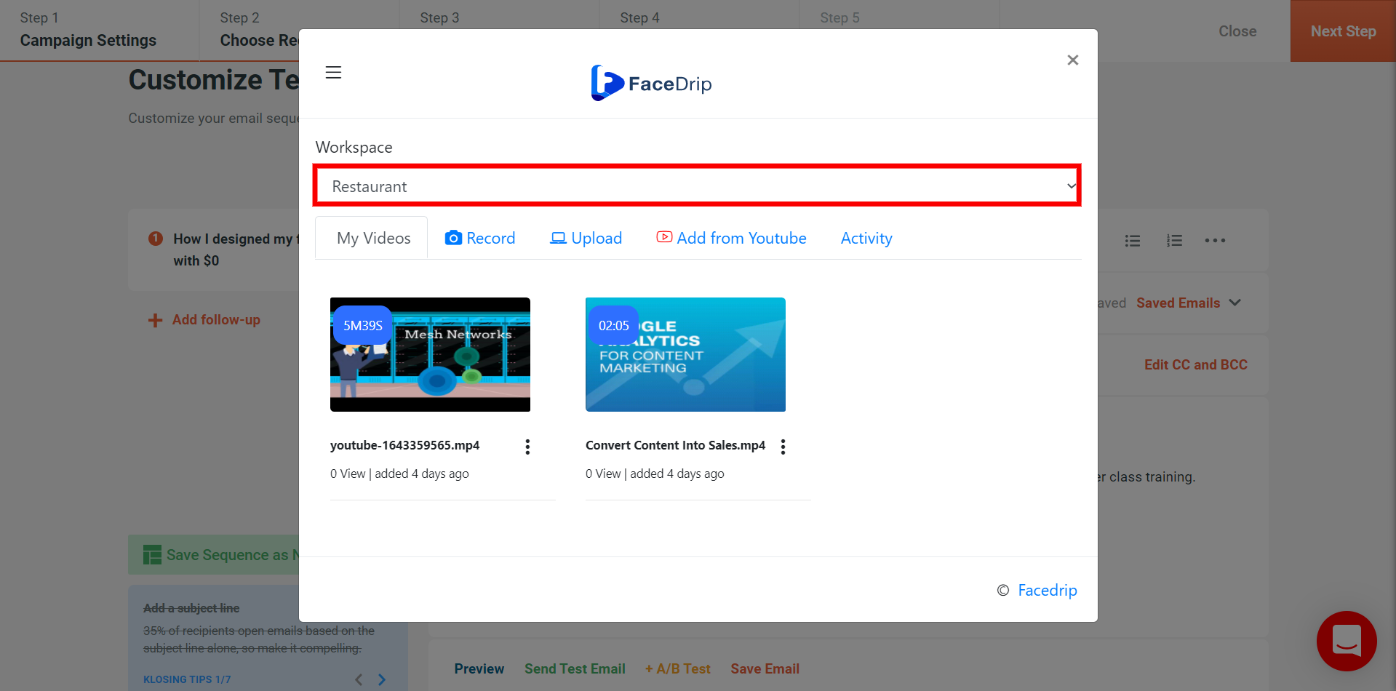
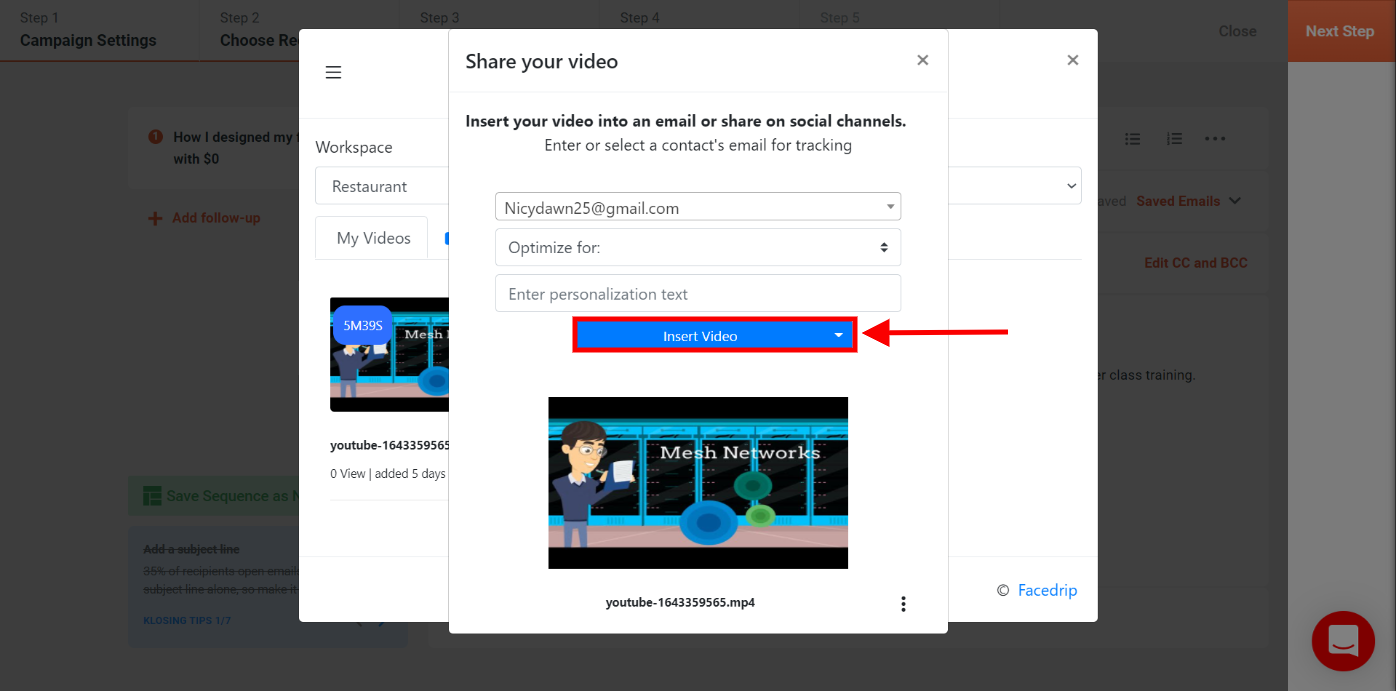
Step 7: After selecting your preferred workspace, select the video that you would want to embed on the email campaign.
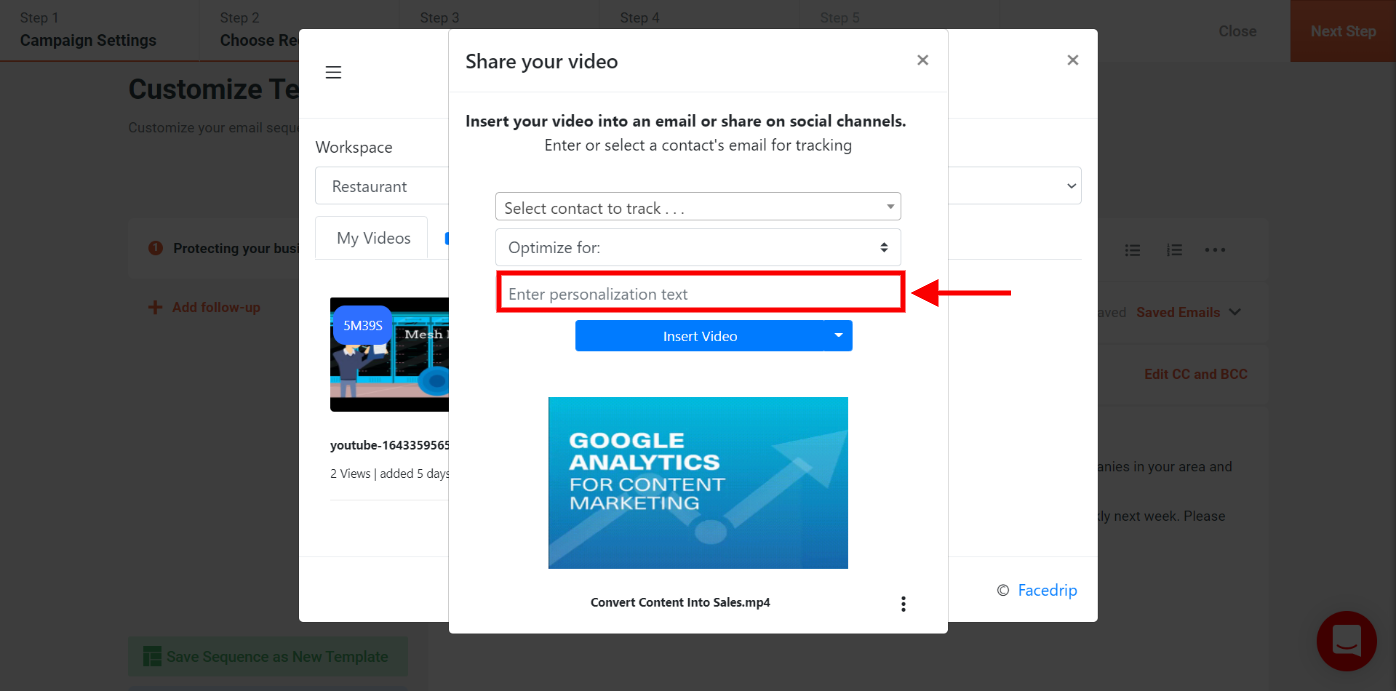
Step 8: After selecting your video, you can ‘enter a personalization text’ .
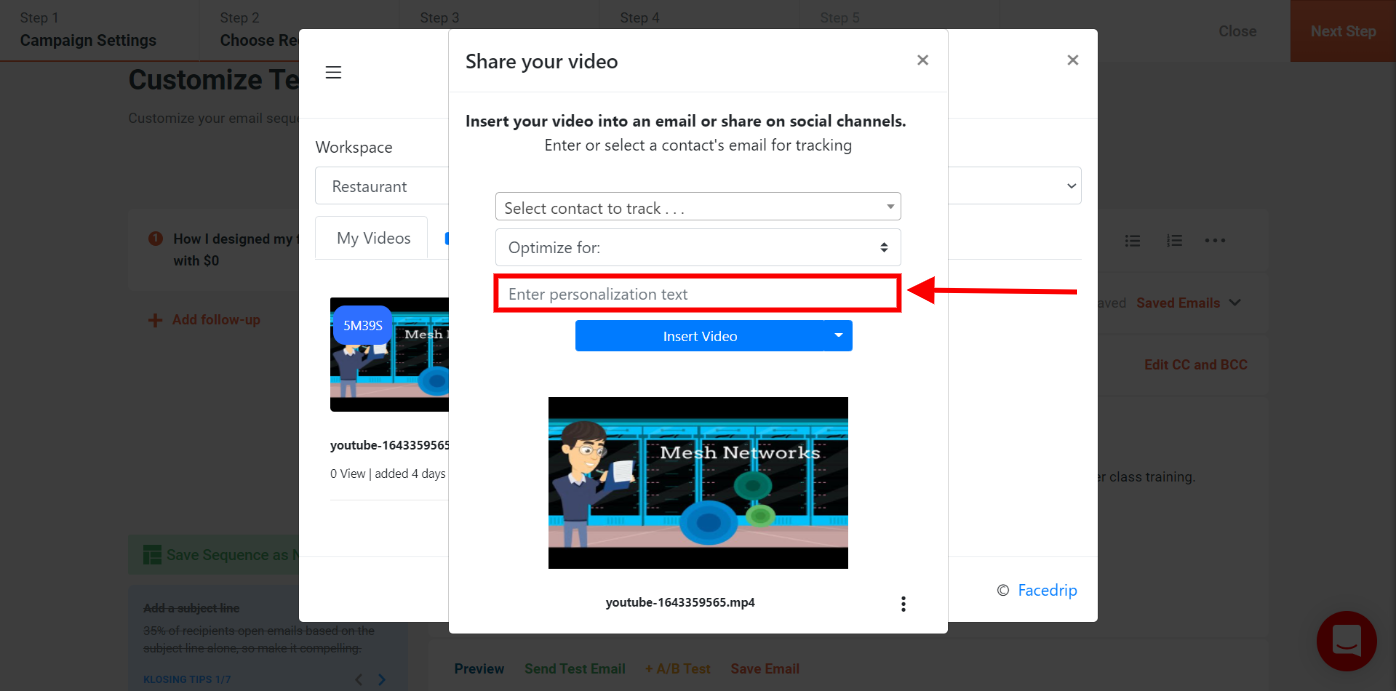
To track your video engagement and get contact level activity reporting on facedrip, you can do this in two ways:
(a) Select a contact’s email for tracking (in the select contact to track field). Taking this action will enable you to track video engagement for just a single contact in your campaign list and get contact-level activity reporting on Facedrip.

(b) Use the optimize for option to track video engagement for all contact in your campaign list and get contact-level activity reporting on Facedrip.

Step 9: Click on the “insert video button”
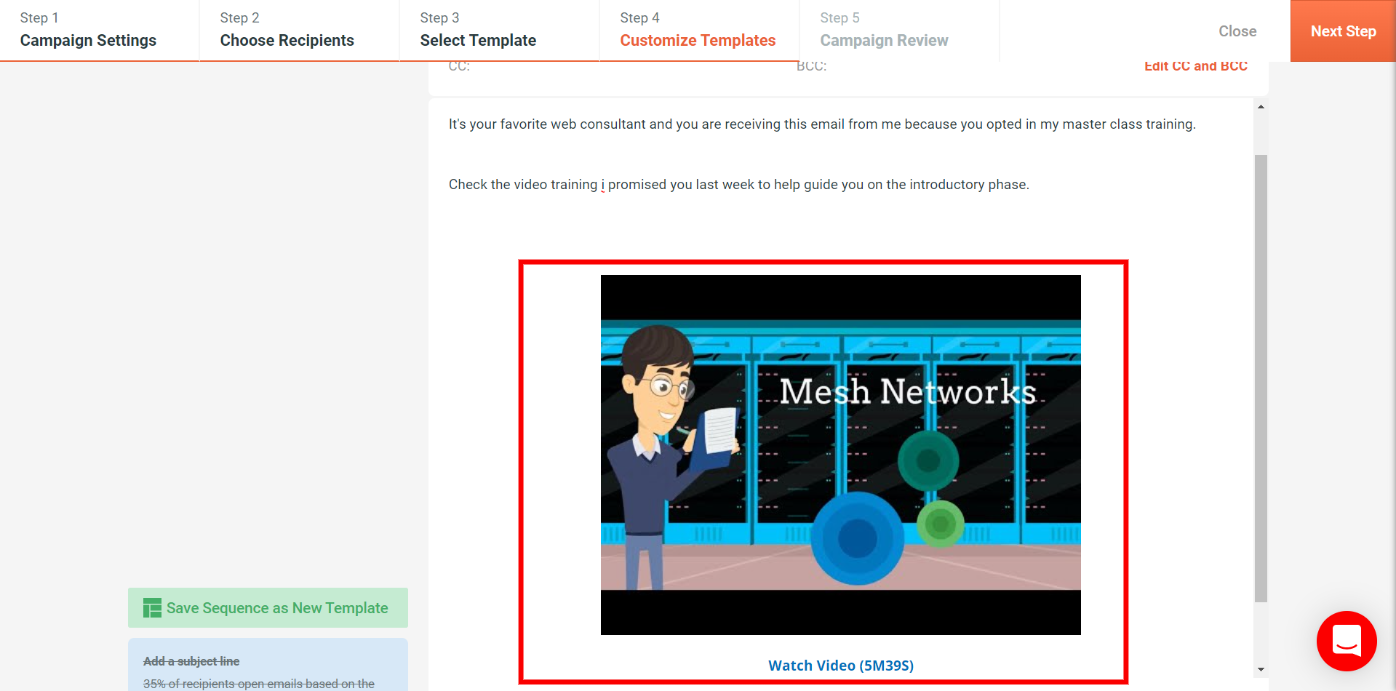
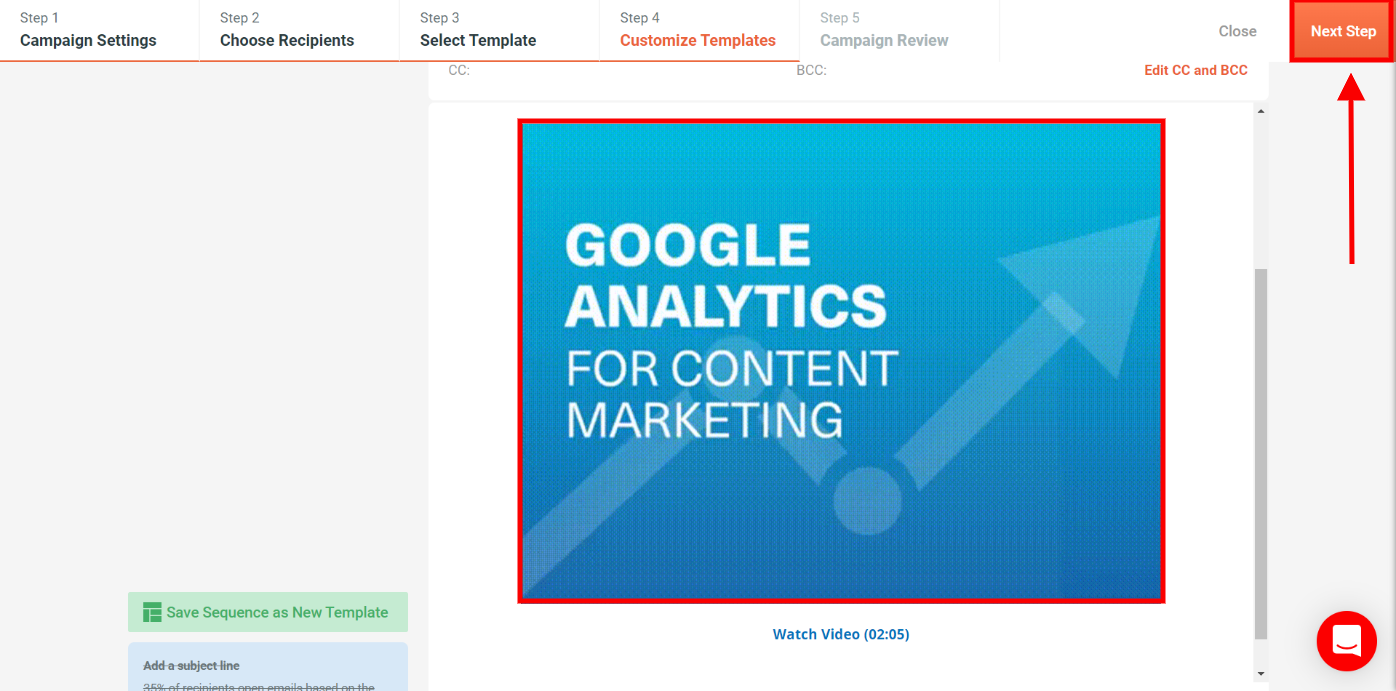
You would see the ’embedded video’ on the email campaign blank template then click the “next step” button.
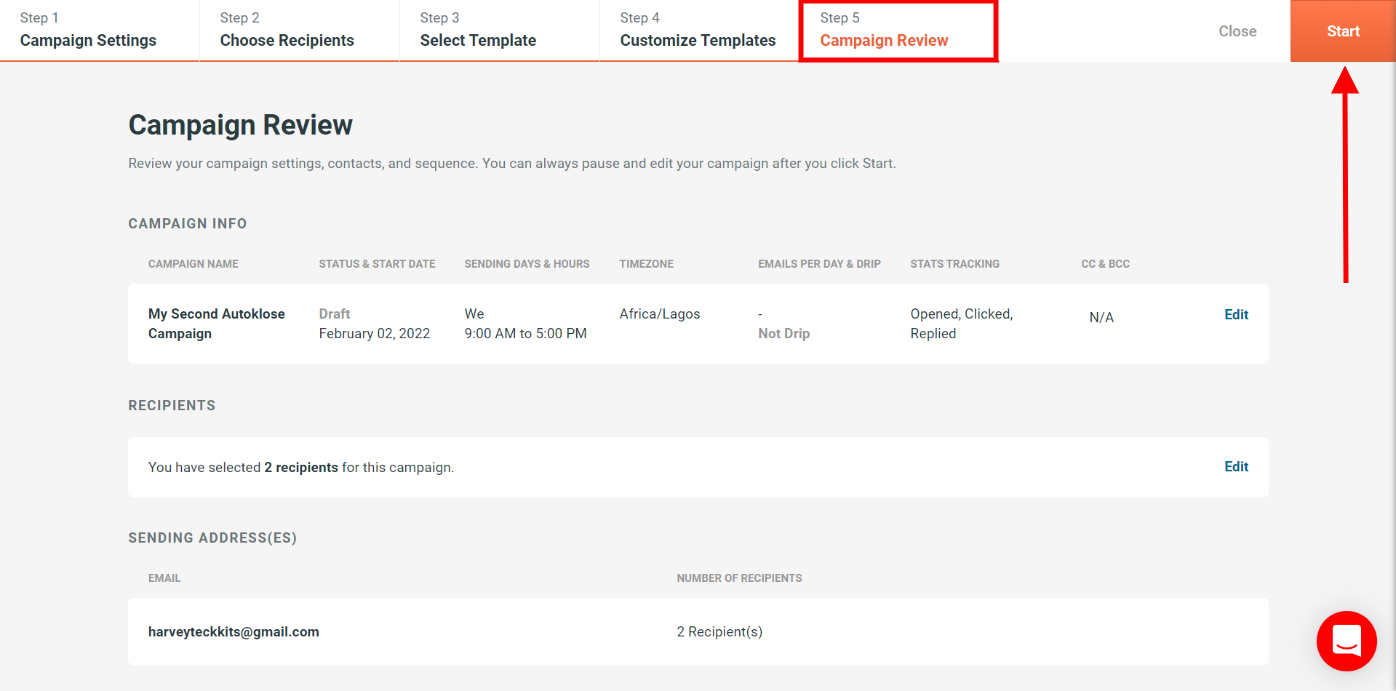
Step 10: You can review email campaign and click the “start” button right away.

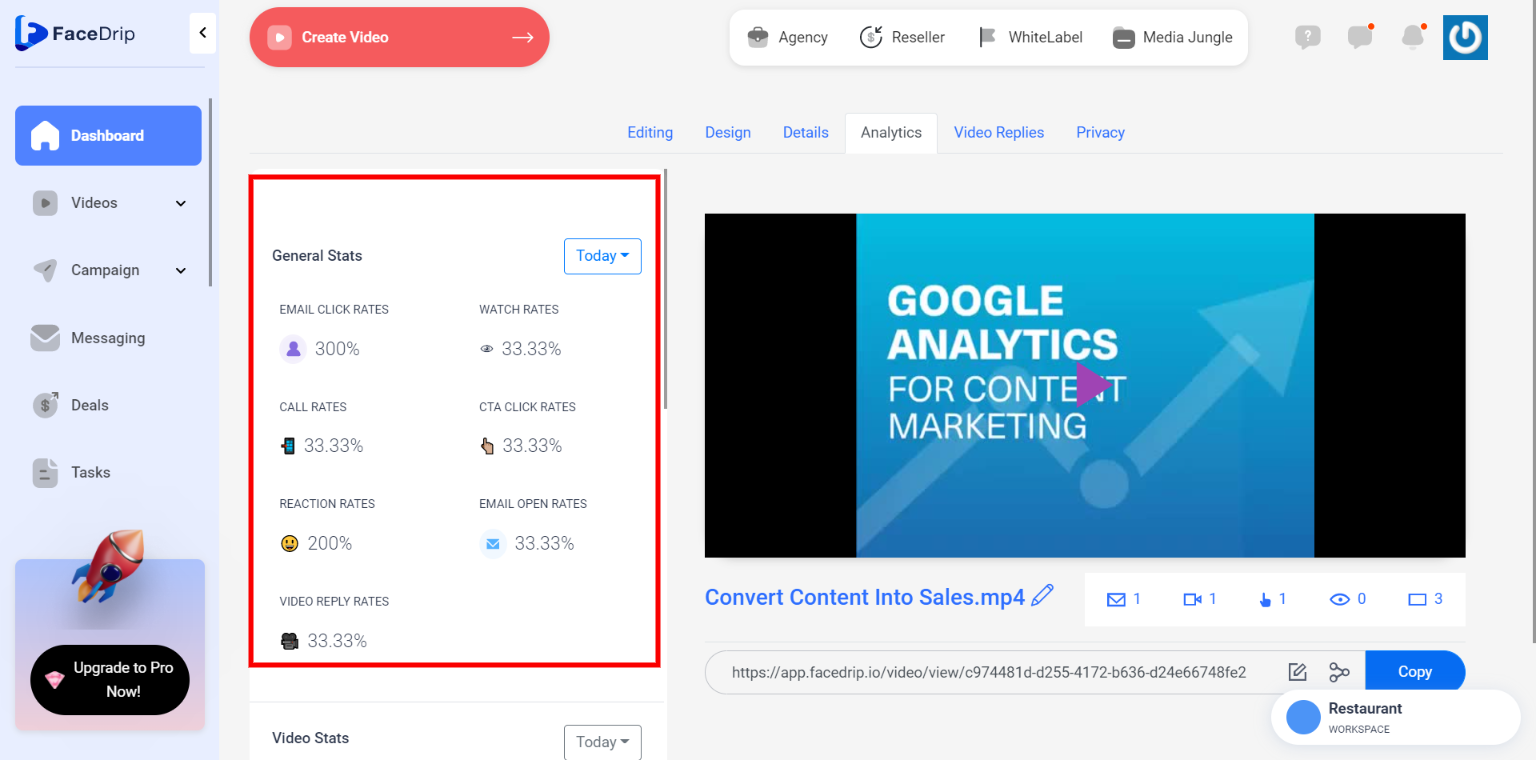
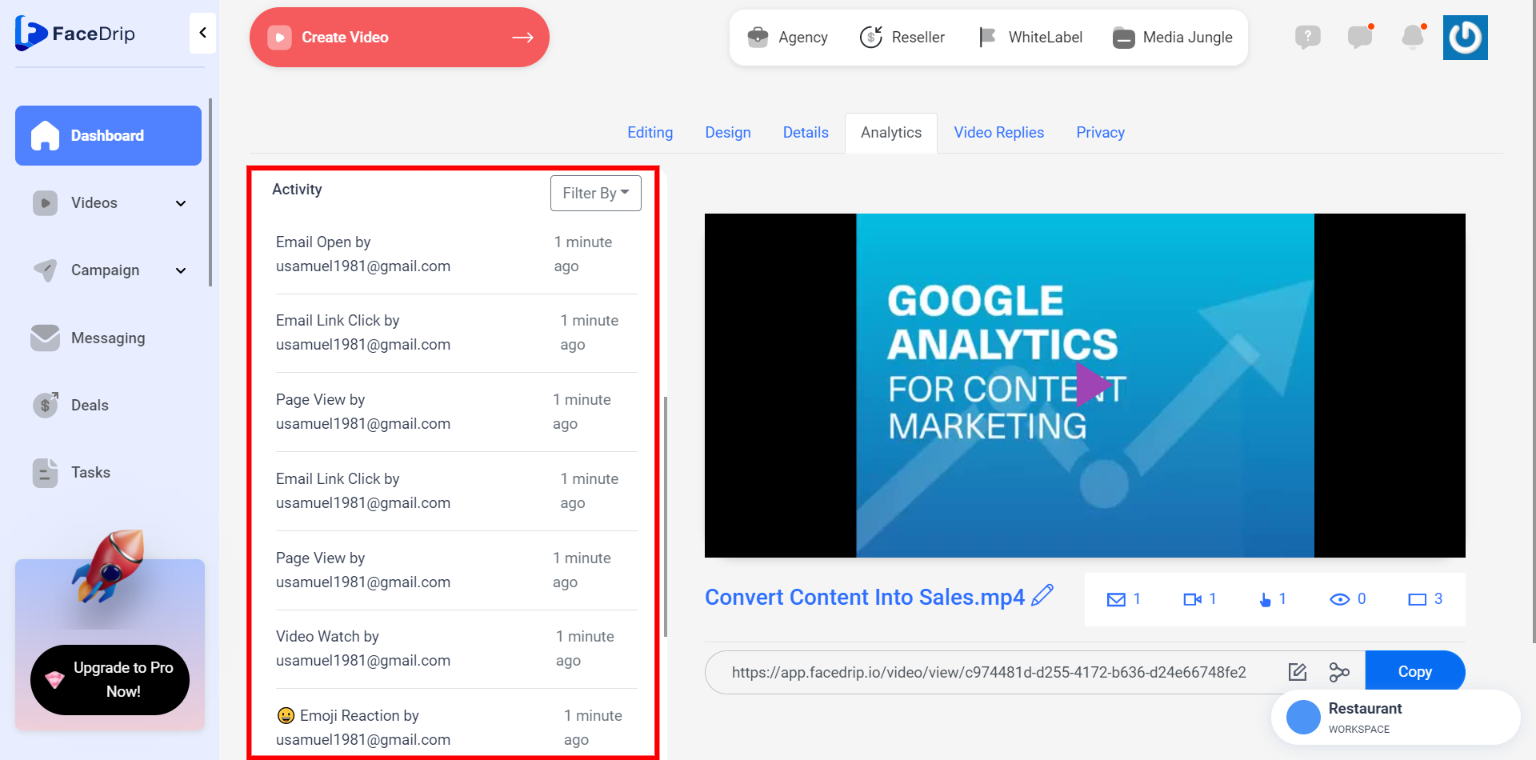
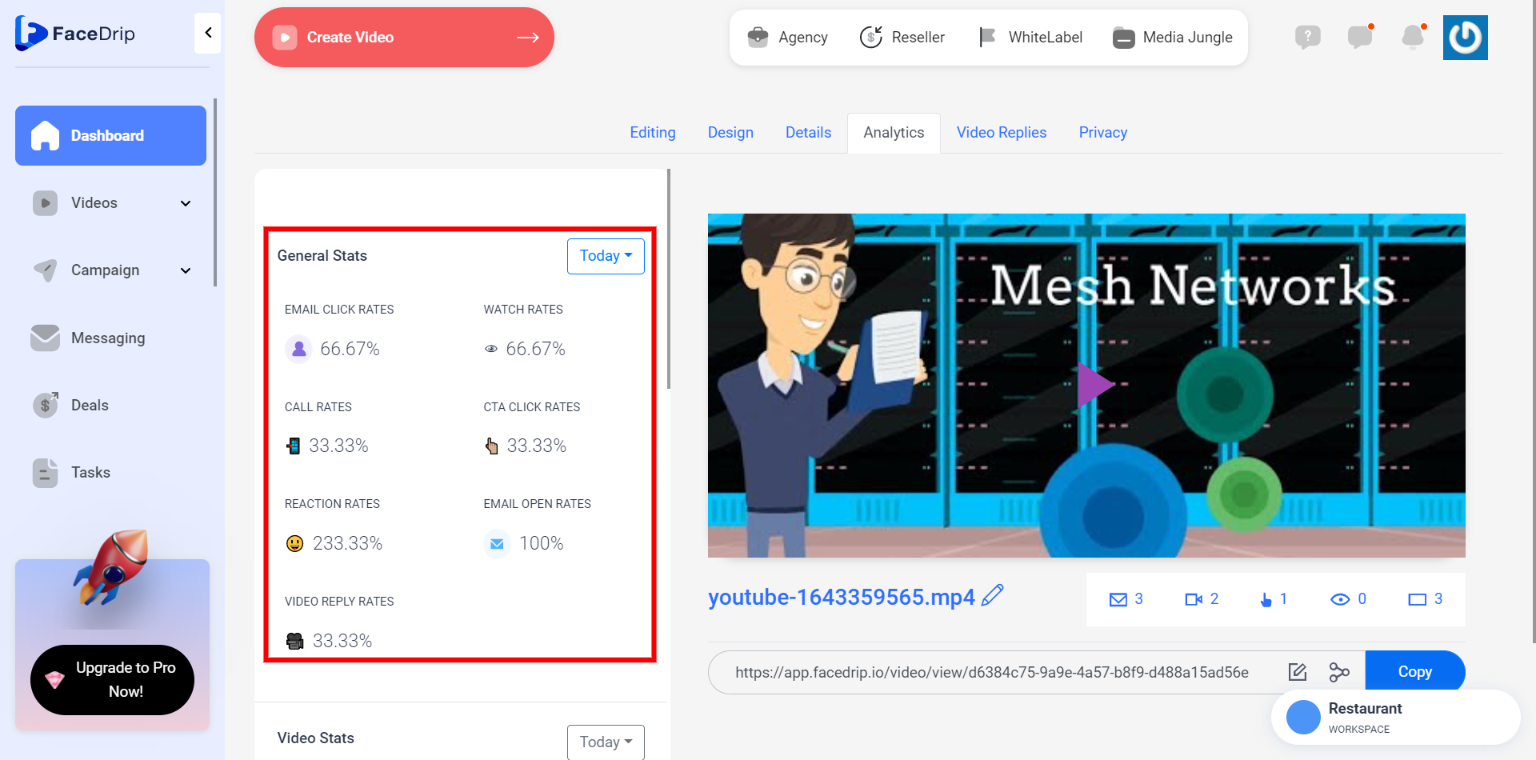
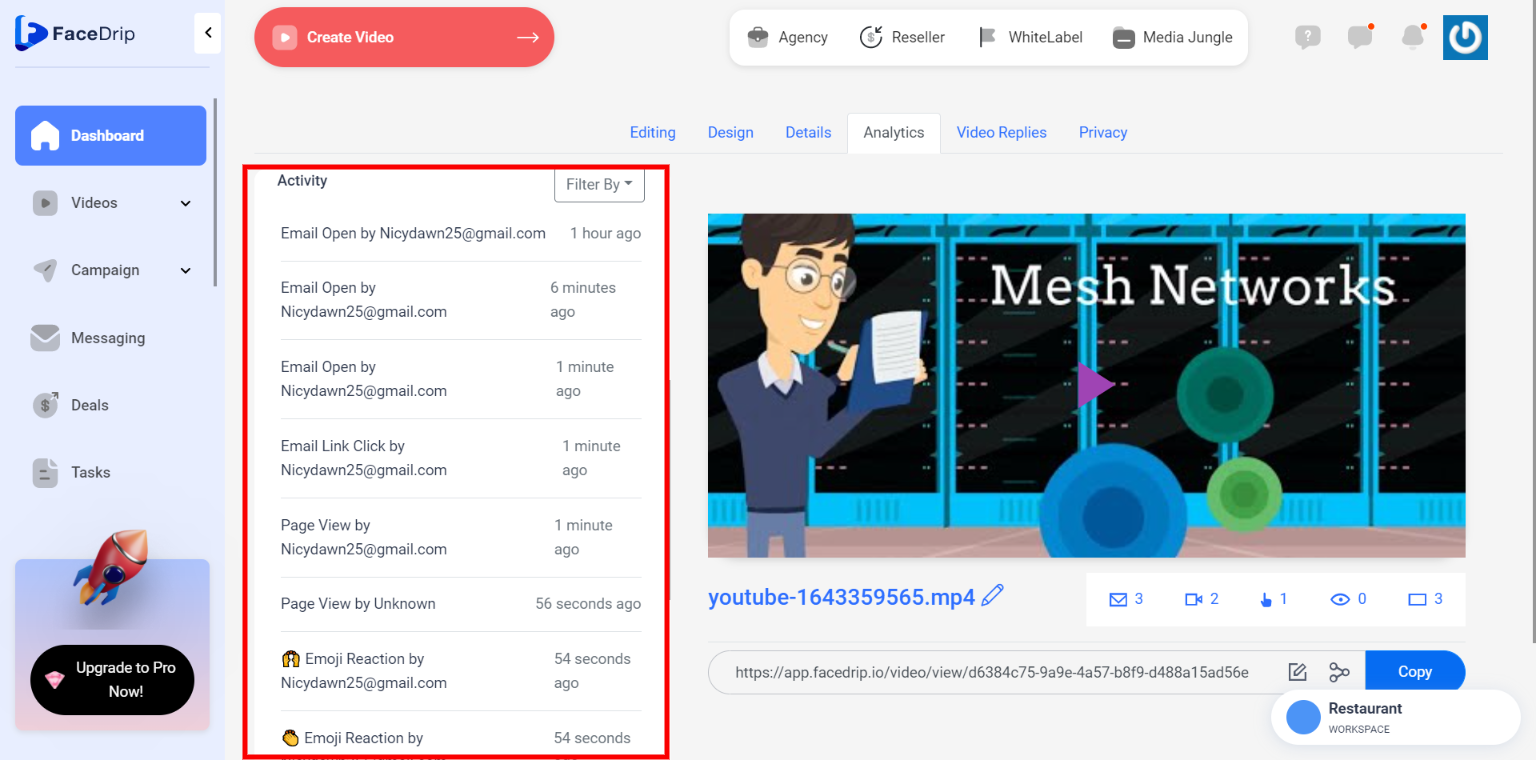
Step 11: Send and then track the performance of the video from the ‘analytics section’ of your Facedrip account to see the ‘general stats’ and ‘activity report’
How To Send Trackable Video Messages In Autoklose Using Default Template
Step 1: Go to your Autoklose dashboard, click on the ‘start a campaign’ button and you will be redirected to the campaign settings page.
Step 2: Enter respective details and select preferred options for the campaign settings section and click the “next step” button as shown below;

N/B: It is optional to enter details in the “CC for campaign” and “BCC for campaign” field
For the CC field(“cc” means carbon copy): enter the email addresses of the people you want to know about the email (remember dat everyone will see their names)
For the BCC field (“bcc” means blind carbon copy): enter the email addresses of the people you want to know about the email but not announce to everyone else dat they are getting a copy
Step 3: In the “Choose Recipients” tab click the “add contact button” to select your preferred option from the dropdown to add contacts then click the “next step” button as shown below;
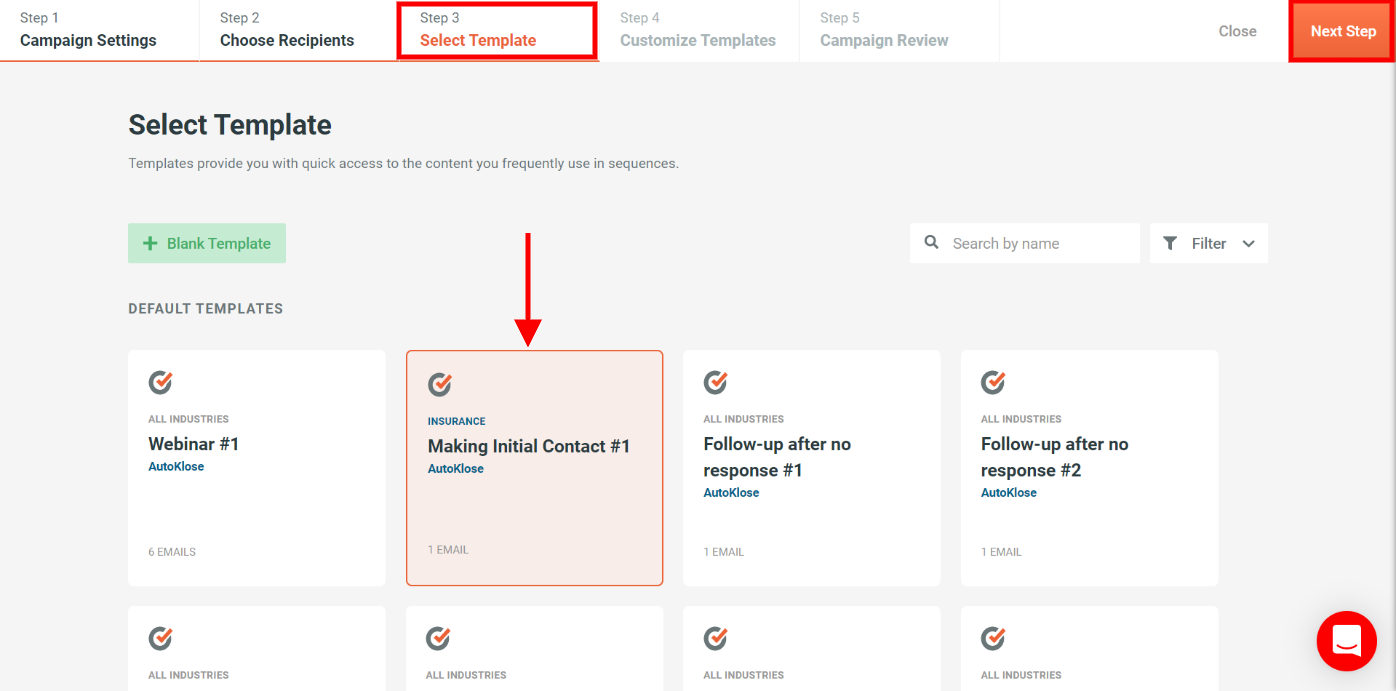
Step 4: In the “select template tab” click on your preferred “Default Template” and the “next step” button and you will be redirected to the “Customize Templates” campaign step where you will see the facedrip extension icon in the toolbar section.
![]()
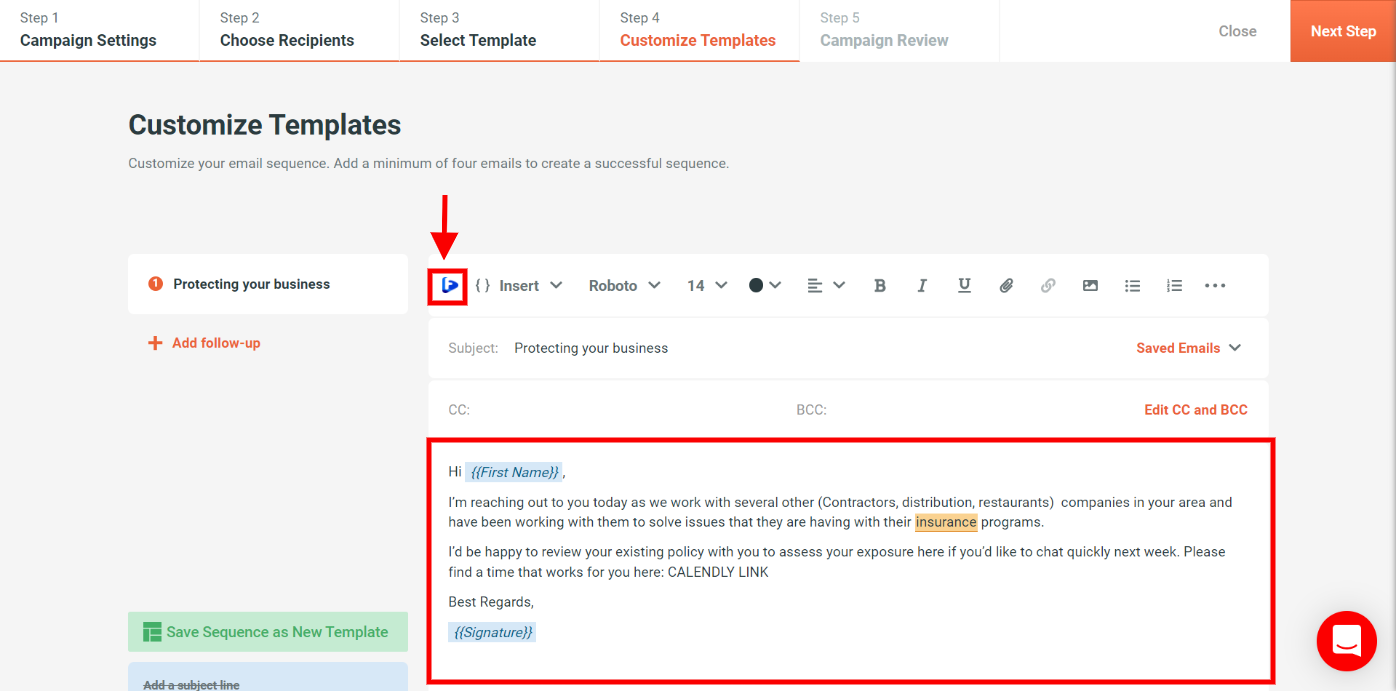
Step 5: Go to the description text box and click the facedrip icon in the toolbar section as shown below
N/B: It is optional to enter details in the “CC for campaign” and “BCC for campaign” field
For the CC field(“cc” means carbon copy): enter the email addresses of the people you want to know about the email (remember dat everyone will see their names)
For the BCC field (“bcc” means blind carbon copy): enter the email addresses of the people you want to know about the email but not announce to everyone else dat they are getting a copy
Step 6: After clicking the ‘facedrip extension icon’ a pop-up modal will appear where you will have the following option to;
- Select your preferred workspace
- Select any of the video upload option such as; already existing videos (my video tab), record a new video, upload a new video, add video from youtube and also view the activity tab.
Step 7: After selecting your preferred workspace, select the video that you would want to embed on the email campaign template.
Step 8: After selecting your video, you can ‘enter a personalization text’ .
To track your video engagement and get contact level activity reporting on facedrip, you can do this in two ways:
(a) Select a contact’s email for tracking (in the select contact to track field). Taking this action will enable you to track video engagement for just a single contact in your campaign list and get contact-level activity reporting on Facedrip.

(b) Use the optimize for option to track video engagement for all contact in your campaign list and get contact-level activity reporting on Facedrip.

Step 9: Click on the “insert video button”

You would see the ’embedded video’ on the email campaign default template and click the “next step” button
Step 10: You can review email campaign and click the “start” button right away.
Step 11: Send and then track the performance of the video from the ‘analytics section’ of your Facedrip account to see the ‘general stats’ and ‘activity report’